
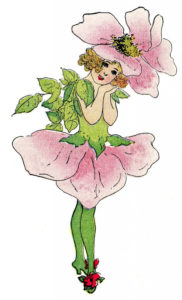
I used Tim Holtz distress glitter for the first time and I love it! It was used on the fairy wings, mushrooms, and the dandelion center to give this card sparkle. It stays in place better than traditional glitter and reminds me of the way the ocean sparkles on a sunny day.
To make this card, I sponged distress inks onto watercolor paper; spritzed it with water; and, after it dried, sprayed it with Tattered Angels Glimmer Mist. The fairy, mushrooms, and dandelion were cut using my Silhouette Cameo.
I put Scor-tape behind the angel wings and mushrooms-adhesive side facing up, sprinkled distress glitter on the front, and removed the adhesive backing. The excess Scor-tape around the fairy wings and mushrooms was cut off with a scissor.
For the dandelion center, I punched a piece of Scor-tape with a Fiskar’s punch. I pulled off the adhesive backing, placed the piece on top of the dandelion, and sprinkled distress glitter on top of that. I anchored the fairy with more Scor-tape and the dandelion with Tombow glue. To finish the card, I stamped the ‘Happy Birthday’ sentiment and used teal cardstock as the base.
Materials:
- Strathmore Watercolor Paper, Cold Press, 140 lb.
- Black Cardstock
- Teal Cardstock
- Tim Holtz Distress Inks: Peeled Paint, Peacock Feathers, Broken China, Salty Ocean, Seedless Preserves
- Tim Holtz Distress Glitter: Tumbled Glass
- From the Silhouette Design Store: Little Fairy, Design ID 73325; Dandelion, Design ID 135032; Cute Mushrooms, Design ID 135650
- Scor-Tape: 1-1/2” and 2-1/2” (for the fairy wings); 3/8” and 1” (mushrooms and dandelion center); and 1/8” and 1/4” (to anchor the fairy)
- Tombow Multi Purpose Liquid Glue
- Tattered Angels Glimmer Mist
- Fiskars Squeeze Punch, Medium, Seal of Approval (for the dandelion center)
- ‘Happy Birthday’ sentiment-Stampabilities Clear Stamps, Everyday Expressions
- Ranger Archival Ink, Jet Black
 (www.thegraphicsfairy.com)
My AHA Moment: When I made this card, I sponged distress inks onto an 11 x 15 piece of watercolor paper, so that I could use the left-over paper to make additional cards. I sprayed the paper with water and lifted that piece of paper onto a blank sheet of watercolor paper. The distress ink ran and left streaks; didn’t look good. I tried it again. This time, I spritzed the paper with water and put a blank piece of watercolor paper on top of the original. I rubbed it and lifted the second generation paper instead. It turned out really good. Plus, I got two pieces of distress ink paper by only sponging once. I dabbed the excess water from the original using a paper towel.
Because of the distress variations of color, I was trying to judge where I should cut the paper to make additional card pieces. Then I thought ‘AHA!’ I cut a piece of transparency film (from Office Max) to the size I wanted it to be for a card. I laid that over the 11 x 15 piece of sponged paper and could see clearly what would be the best looking cuts.
I hope that you liked this card and thanks for stopping by!
Have a beautiful day!
Diane
