I created this card using a design by the Silhouette Design Store, along with my Cameo 4.
I wanted to make a special card for my youngest son’s birthday, so I got excited when I saw this design in the Silhouette Design Store. It was perfect because he has a woodworking shop in his garage. He’s just beginning to work with wood, but he’s already created some beautiful pieces of furniture. Plus, I FINALLY get to use my Diamond Plate embossing folder!
Materials:
Core’dinations Cardstock, Silver Pearl
Core’dinations Sand it, Tear it, Emboss it, Love it Cardstock, Tulip
Teal Cardstock
The Paper Studio White Paper
Darice Cardstock Base, Jet Black
Center Box Card Father’s Day Tools, Design #294342-Silhouette Design Store
Darice Embossing Folder, Diamond Plate
“Happy Birthday” Sentiment, Stampers Anonymous, Tim Holtz Collection, Crazy Talk-CMS236
VersaFine Clair Ink, Nocturne
Tim Holtz Tonic Stamp Platform
Scor-Tape: 1/8“, 1/4”
Machines:
Sizzix Big Shot, with the Extended Multipurpose Platform and two cutting pads (for the embossing folder)
Silhouette Cameo 4, with Silhouette Cameo Cutting Mat
Thanks for stopping by my website! Be safe and be well!!!
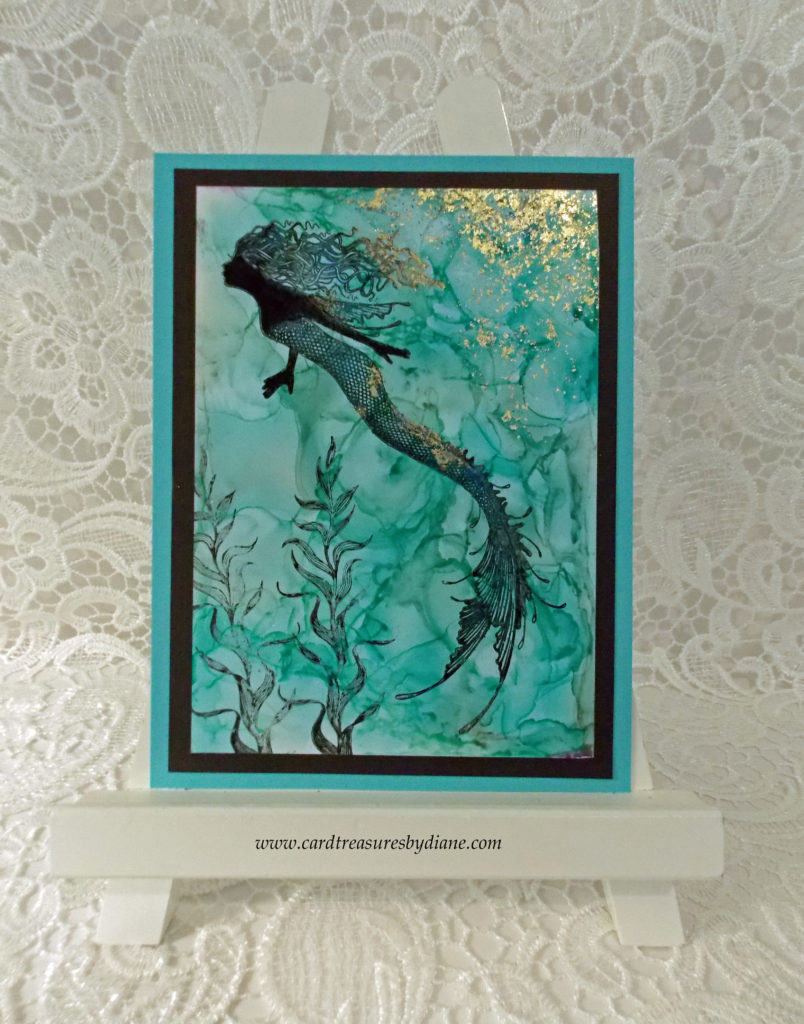
I created this card using alcohol inks, Lavinia Stamps, and a sprinkling of moon dust.
To begin the card, I put a few drops of Patina and Slate alcohol inks onto a piece of Yupo cardstock; added some alcohol blending solution to this; and lifted the Yupo cardstock and moved the alcohol inks/blending solution around. CAUTION: Be sure to use adequate ventilation when working with alcohol inks.
(I bought a Revlon Hot Air Brush specifically to use with these inks. I can’t recommend it yet because I’ve only used it once, so I don’t know its longevity. But two things I really liked about it: The description said it’s 500 watts, which is a good air flow to move the inks around, without being too much; and it has a Cool Shot button so the Yupo cardstock didn’t warp. The one I bought is pictured below.)
I removed the brush attachment from the Revlon Air Brush and blew the inks/solution around the card. I found that I got a better result if I moved it circling around the edges of the ink, moving towards the center of it. Being close to the cardstock, maybe about 1/2”-3/4” above the Yupo, also helped. If there was a hard edge of alcohol ink, I added more blending solution, and used the Revlon dryer to make it softer.
It was getting late, so I stamped the images the next day. Alcohol ink dries quickly, but I wanted to be sure it had completely dried. I used a Quickie Glue Pen to add some dots of glue on Zelith’s hair and body, as well as on the right-hand corner of the card. I wanted it to look like the sun was shining through the water and reflecting onto the mermaid, so I put some Nuvo Gilding Flakes on the glue dots and brushed off the excess.
I sprinkled some Sea Breeze Moon Dust over the rest of Zelith’s hair and her beautiful scales. You can’t really tell from the picture, but the moon dust really sparkles. I used the Quickie Glue Pen, before I did this, but the alcohol inks might have helped the moon dust to stick, also.
I used Scor-Tape to attach the layers, the Yupo cardstock to the black; the black to the teal. There’s another new Lavinia mermaid. I can’t wait to add her to a card!!!
Materials:
Tim Holtz Alcohol Ink Yupo White Cardstock
Teal Cardstock
Black Cardstock
Ranger Alcohol Inks: Patina and Slate
Ranger Alcohol Blending Solution
Lavinia Stamps: Zelith and Marine Kelp (Tracey Lavinia Dutton is the artist of the Lavinia stamps.)
Nuvo Gilding Flakes, Radiant Gold
Sakura Quickie Glue Pen
Ranger Archival Ink, Jet Black
Sea Breeze Moon Dust (Lavinia Stamps)
Revlon Ceramic Hot Air Brush Kit with 1” and 1-1/2” Brush Attachments. Model RV444 is listed on the box. I got it from Amazon for $19.99 at the time of this post.
Wilton Bake It Better Large Baking Pan, 16 x 12 x 1 in, with non-stick coating (I found this at my local Walmart. I lined it with some aluminum foil and then put the alcohol inks and blending solution onto the Yupo paper. I have a glass media mat, but I like the edges on this pan. That way, I don’t need to watch so the alcohol ink bottles don’t fall over the edge.)
I created this card using two designs from the Silhouette Design Store, along with a Happy Messages Stampendous stamp.
My sister and I usually get together on my brother’s porch to celebrate his birthday. This year, because of COVID-19, we decided to forego this. But he couldn’t escape my singing Happy Birthday to him on the phone…I think I’m tone deaf. These designs, from the Silhouette Store, reminded me of him-as his big sister, I think he’s cool!
I used my Cameo to cut the designs from the cardstock, adhered the pieces to the cardstock base, and stamped the sentiment. I added Diamond Stickles on the glasses’ frame and around the lens, then decided my brother probably wouldn’t appreciate all that glitter. To solve this, I die-cut another pair of glasses and used Ranger Multi Medium Matte to adhere it onto the existing frame.
I love how the glitter cardstock makes the mustache sparkle when you look at the card. My brother is my computer guru-maybe his mustache is his super power!!!
Materials:
Park Lane Paperie, Solid Core, Smooth, #65, Black
Bazzill Cardstock, Red
Blue Cardstock
Gold Glitter Cardstock
Park Lane Paperie, Smooth, #110, 8.5 in x 11 in, White Core (Cardstock Base)
American Flag Sunglasses, Design 325431 (for the sunglasses)-Silhouette Design Store
America Glasses, Design 139706 (for the mustache)-Silhouette Design Store
Happy Messages, Fran’s Stampendous Clear Stamps
VersaFine Clair Ink, Nocturne
Tim Holtz Stamp Platform
Ranger Stickles, Diamond
Adhesives: Ranger Multi Medium Matte and Glossy Accents; Scor-Tape: 1/8” and 1/4”
Machine:
Silhouette Cameo 4, with Silhouette Cameo Cutting Mat
Thanks for stopping by my website! Be safe and be well!!!