Enchanted Dreams

I created this card using Brushos, Brusho SprinkleIT, Lavinia stamps, and VersaFine Clair ink.

I recently watched a video where Tracy Dutton, Lavinia Stamps, created a beautiful card with Brushos, VersaFine Clair Ink, and her amazing stamps. I was given Amazon gift certificates at Christmas and hadn’t tried Brushos or the ink, so I decided to check them out.

Colourcraft Brusho Crystal Colour: These are transparent, highly pigmented watercolor powders. When you add water to them, the crystals explode into vivid colors. I didn’t take the covers off the containers when I received them. The powder is really fine, and I knew I’d get it all over. Instead, I used a plastic push pin to poke a hole in each cover, then left one in each of the container covers.

When I was searching for information on Brushos, I went to the Colourcraft website where I found several videos:

https://www.colourcraftltd.com/brusho/brusho-youtube-videos

VersaFine Clair Inks: I love these inks! The fairies and the skeleton tree stamps had previously been used, but cleaned well. The rest of the Lavinia stamps were new. I first applied the color Cheerful, from the VersaFine Clair inks, onto a Lavinia stamp and wiped off that color; then applied Nocturne (which is basically black) to it. The idea being that if I put a lighter color on the stamp first, then the darker color wouldn’t stain as much. After I stamped the image, I used a baby wipe to clean the stamp and then ran water over it at the sink. It was incredibly easy to stamp a solid image with this ink, the detail was excellent, and it cleaned off easily. The new stamps cleaned up slightly better versus the ones that had already been used…but I’m probably the only one who would notice that.

(Random Tip: Place a kitchen colander under stamps while you’re washing them over the sink. That way, they can’t accidentally go down the drain.)

I wanted to see how these inks did on other things, too…

I tried a couple different brands of (new) clear stamps, just in case the Lavinia Stamps had been kissed by fairies before they left England, and that’s why they cleaned up so well. Again, I used Cheerful first; then Nocturne, and the ink cleaned off easily on those, too.   

Next, I tried a new rubber stamp. I repeated the process with Cheerful first, and the rubber stamp cleaned up really well. I tried applying Nocturne without first putting on Cheerful. It didn’t wipe off-I cleaned it with Staz-On and the ink didn’t come off completely.

I wanted to see how Copics worked with these inks. The ink smeared. I’ll stick to using Memento inks-these are excellent to use with Copics.

I learned…with distress inks/oxides, I can either tell what color it is by just looking at it or by looking at the color chart-if I look back at something I did earlier. With Brushos, I need to write down the colors that I use at the time I make a card because I didn’t think to do it this time. I couldn’t remember or tell by just looking at it.   

Materials Used:

  • Strathmore Watercolor Paper, Cold Press, 140 lb.
  • Core’dinations Cardstock Base, Hydrangea
  • Lavinia Stamps: Fairy Foragers (set of four mini fairies), Once Upon A Dream, Skeleton Tree, Celestial Tree, Unicorn 2, Secret Garden, and Climbing Ivy. (Tracey Lavinia Dutton is the artist of the Lavinia stamps.)
  • Colourcraft Brusho Crystal Colour
  • Colourcraft Brusho SprinkleIT, Iridescent Flash
  • Tsukineko VersaFine Clair, Nocturne
  • Tsukineko VersaFine Clair, Cheerful
  • Stardust Gelly Roll Pen, Sakura, Clear
  • Fiskars Procision Rotary Bypass Trimmer (12”)
  • Ranger Mister and Mini Mister
  • Martha Stewart Scoring Pad; Fiskars Dual-Tip Embossing Stylus
  • Tim Holtz Tonic Stamp Platform
  • Baby Wipes/Paper Towels

Have a wonderful day!!! Thanks for stopping by my website!

Diane
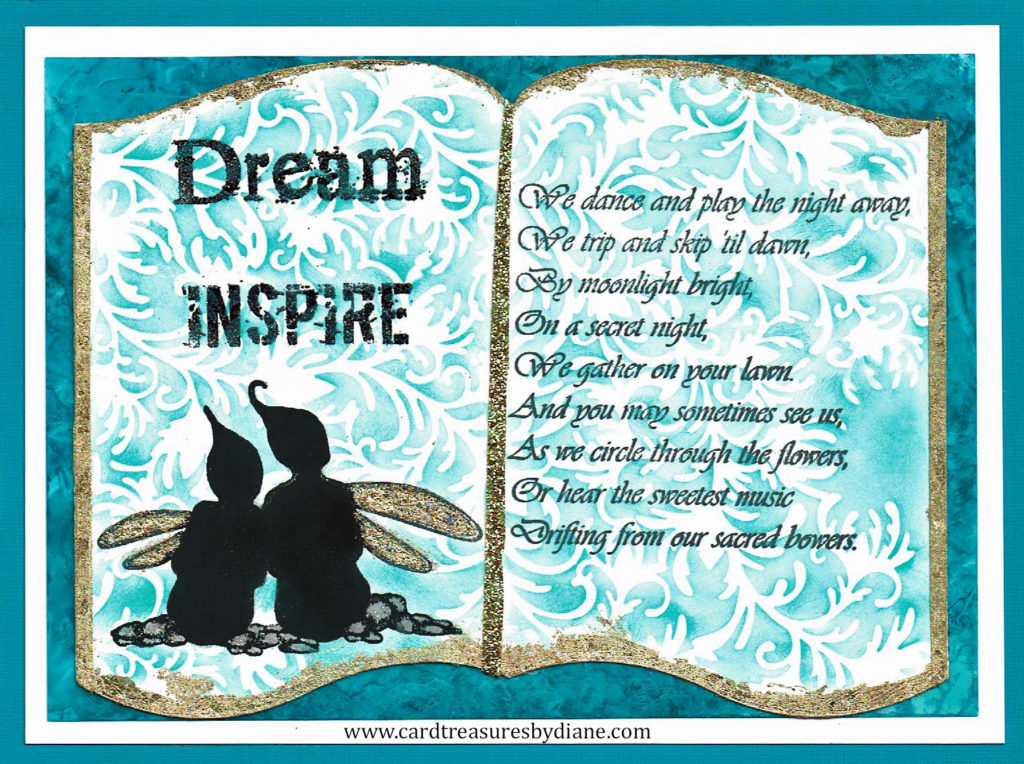
Book of Dreams

I created this card using Lavinia Stamps and stencil, Alcohol Inks, Distress Oxide, a design from the Silhouette Design Store, Copics, and Cosmic Shimmer Gilding Flakes.

I’ve entered this card in the January Lavinia Stamps Challenge-this month’s theme is “A Story to be Told.”

To begin this card, I used my Silhouette Cameo to cut out the book design. I stamped the fairies and the verse with Memento ink; then colored the stones below the fairies with Copic markers and added sparkle to them with a Sakura Gelly Roll pen.

I wish you could see the sparkle on the words Dream and Inspire. (I tried to capture it with my camera but wasn’t successful.) I used a VersaMark Watermark Stamp Pad, along with Black Sparkle Embossing Powder that was heat embossed, to create these stamped images. The end result was beautiful! The words sparkled in so many colors.   

I wanted to give the book design a vintage feel so I added gilding flakes. I put 1/8” wide strips of Scor-Tape on the front two sides of the card; peeled off the top layer of the tape which left the sticky side on the cardstock; pressed gilding flakes into that with a piece of a Ranger Stamp Cleaning Pad; and wiped off the excess flakes with this pad.

I applied FlitterGlu across the top and bottom of the book and the fairy angel wings (with a paint brush) and pressed some gilding flakes on top; then wiped off the excess flakes again with the pad. To separate the pages of the book, I put a strip of glitter tape down the middle and secured it with Ranger Multi Medium Matte.

(I made the alcohol inked paper this fall when I could open windows for adequate ventilation. When I did this, I put a piece of aluminum foil on my work area and used the Smooshing Technique. I chose four colors of alcohol ink, plus the Pearl Mixative. I generously applied the ink in squiggly lines onto the foil in different areas and added four drops from the Pearl Mixative bottle. I laid a piece of Yupo paper on top of the inks; gave a twist, and patted it down to spread the inks across the paper.)

I layered the book design, the alcohol inked paper, white cardstock, and teal cardstock, using 1/4″ and 1/2″ Scor-Tape to attach each layer; then placed the Lavinia stencil over the book design and used a Picket Fence brush to sponge Peacock Feathers distress oxide over the stencil.

Materials Used:

  • Park Lane White Solid Core Cardstock, Smooth, 110#
  • Tim Holtz Alcohol Ink Yupo Paper, Translucent
  • Teal Cardstock
  • Lavinia Stamps: Star Gazing, Dream and Inspire from the Inspire Me set, and Secret Night. Stemcil: Flourish (Tracey Lavinia Dutton is the artist of the Lavinia stamps and stencil.)
  • Swirl book frame background, Design #111652-from the Silhouette Design Store. (This book design includes beautiful flourishes at two of the corners; but after I stamped the verse, they wouldn’t fit in space I had for this size card.)  
  • Cosmic Shimmer Gilding Flakes, Warm Sunshine
  • IndigoBlu FlitterGlu
  • Small piece of Ranger Rub-It Scrub-It Stamp Cleaning Pad
  • Ranger Alcohol Inks: Mermaid, Ultramarine, Turquoise, Pool, and Pearl Mixative
  • Ranger TH Distress Oxide, Peacock Feathers
  • VersaMark Watermark Stamp Pad
  • Ranger Embossing Powder, Black Sparkle
  • Picket Fence Studios Life Changing Blender Brush
  • Darice Heat Tool
  • Copics: Colorless Blender, T0, T1, T3, T5
  • Copic Multiliner, Black, 0.3 (after I put the gilding flakes on the fairy wings, I needed to use this pen to outline the wings again.)
  • Tim Holtz Tonic Stamp Platform
  • Fiskars Procision Rotary Bypass Trimmer (12”)
  • Martha Stewart Scoring Pad/Fiskars Dual-Tip Embossing Stylus
  • Memento Ink, Tuxedo Black
  • Stardust Gelly Roll Pen, Sakura, Clear (I’m REALLY starting to love this pen!)
  • Ranger Multi Medium Matte
  • Scor-Tape: 1/8”, 1/4″, and 1/2″
  • Rubber Gloves/Baby Wipes/Paper Towels

Machines:

Silhouette Cameo

Keep warm and have a beautiful day!!!

Diane

Believe in Your Dreams

I created this card using distress inks, Lavinia stamps, and glitter.

I began by putting a strip of Wilted Violet distress ink on the glass media mat; then used a mini blending tool to apply the ink onto a piece of cardstock. I continued laying down the rest of the inks leaving a white space between each of the colors; then went back in and used mini blending tools to blend the colors together.

The Lavinia images were stamped with Memento Ink. (Sometimes I have trouble getting a solid stamped image. When this happens, I take a fine-tipped paint brush; dab it onto the Memento stamp pad; and use it to fill in the areas that didn’t ink completely. I may have to do this a few times, but the areas do fill in.)  

I tried the Stardust Gelly Roll pen for the first time. I really liked it…it added sparkle to the fairy’s wings and didn’t affect the Memento Ink. Wink of Stella was added at the top of the card. I applied FlitterGlu to the hares, hearts, and the snow area (with a paint brush); then sprinkled holographic embossing powder on top of that and tapped off the excess. Some of the glitter that was in the holographic powder came off, after letting it dry for a bit, so I grabbed my heat tool and heat embossed it, too.

The inside of the card:  

Materials Used:

  • Strathmore Watercolor Paper, Cold Press, 90 lb.
  • White Cardstock Base
  • Ranger Tim Holtz Distress Inks (top to bottom): Wilted Violet, Picked Raspberry, Abandoned Coral, Fossilized Amber, and Squeezed Lemonade
  • Lavinia Stamps: Freya, Skeleton Tree, Woodland Hares, Dream from the Inspire me stamp set, Group of Hearts (mini), and Fairy Happy Birthday (Tracey Lavinia Dutton is the artist of the Lavinia stamps.)
  • Memento Ink, Tuxedo Black
  • Stardust Gelly Roll Pen, Sakura, Clear
  • Wink of Stella, Clear
  • IndigoBlu FlitterGlu
  • Darice Heat Tool
  • Ranger Embosssing Powder, Holographic
  • Ranger TH Mini Blending Tools/Foam
  • Tim Holtz Tonic Stamp Platform
  • Fiskars Procision Rotary Bypass Trimmer (12”)
  • Martha Stewart Scoring Pad/Fiskars Dual-Tip Embossing Stylus
  • Tim Holtz Tonic Glass Media Mat
  • Scor-Tape: 1/2″
  • Baby Wipes/Paper Towels

Thanks for checking out my card and visiting my website! Have a magical day!!!

Diane

Golden Fairy

Have a Fairy Happy 2019!!!

Materials Used:

  • Darice Cardstock, Jet Black;
  • Core’dinations Cardstock, King’s Crown (the glitter cardstock);
  • Gold Foil Cardstock;
  • Sizzix 3-D Texture Fades, Botanical, 662716;
  • Little Fairy, Design #73325-Silhouette Design Store;
  • Spellbinders Nestabilities Labels Eight, S5-019;
  • Cosmic Shimmer Gilding Flakes, Warm Sunshine;
  • Ranger Mister;
  • Ranger Multi Medium Matte (used as an adhesive);
  • Ranger Rub It-Scrub It Cleaning Pad;
  • Cricut Weeder;
  • Scor-Tape: 1/8”, 1/4”, and 3/8”;
  • Scor-Tape: 2.5”-(To make the wings: I die-cut the fairy with my Cameo, then removed the excess cardstock pieces from the wings using a Cricut weeder. I put the wings on a 2.5” wide piece of Scor-Tape, the adhesive side facing up. I pressed some Cosmic Gilding flakes onto the tape and rubbed lightly with a small piece of Ranger Rub It-Scrub It Pad until the gilding flakes looked blended. I removed the Scor-Tape backing behind the fairy, then fussy cut around the wings to remove the excess Scor-Tape.)

Machines Used:

  • Silhouette Cameo 4, with Silhouette Cameo Cutting Mat
  • Sizzix Big Shot, with two cutting pads, and the magnetic platform (for the Spellbinders die)
  • Sizzix Big Shot, with the Extended Multipurpose Platform base (plus Tab 1) and one cutting pad (for the 3-D Texture Fades embossing folder)

If you would like to see a previous post that explains how to run the 3-D embossing folder through the Big Shot, because it’s thicker than normal, please check out:

Have a beautiful day!!!

Diane