Congrats Graduates

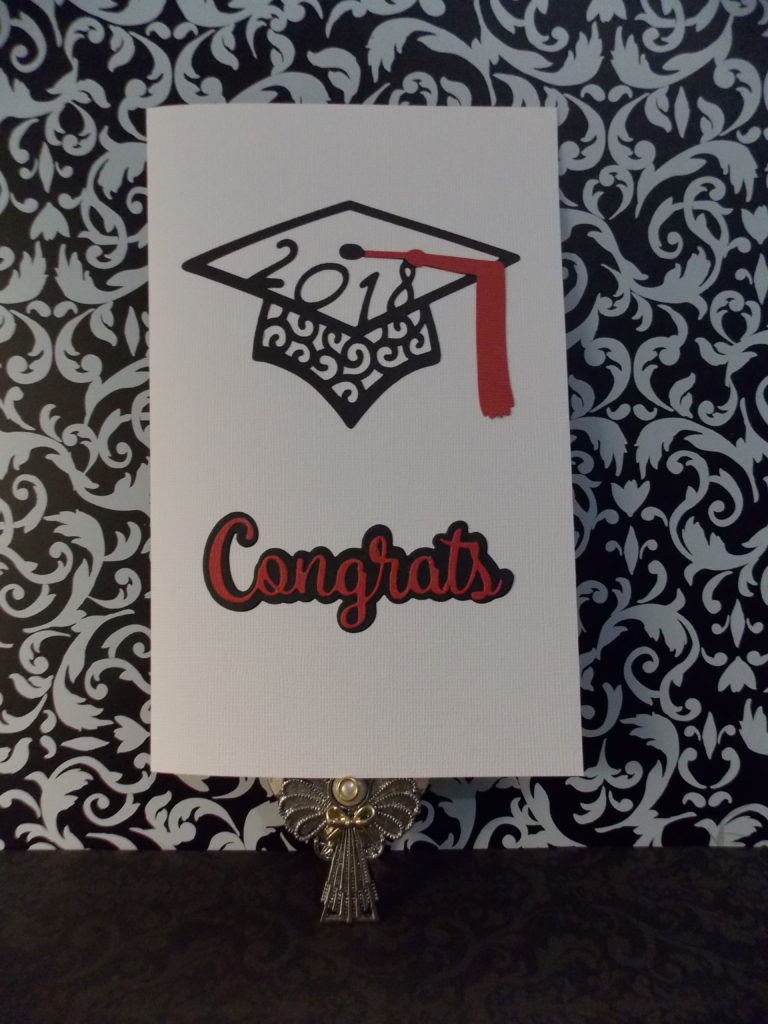
I created this card using a Pink and Main die set and a design from the Silhouette Design Store. I have decided to show my Cameo more love!

Congratulations to the graduates of 2018!!!

Materials Used:

  • Core’dinations Cardstock, Bright White
  • Black and Red Cardstock
  • Silhouette Design Store, Graduate Cap 2018, Design 267832
  • Pink and Main, Congrats Word and Shadow Dies, PNM095
  • Fiskars Procision Rotary Bypass Trimmer (12”)
  • Martha Stewart Scoring Pad/Fiskars Dual-Tip Embossing Stylus
  • Cricut Tools Weeder
  • Zig 2 Way Glue
  • Scor-Tape: 1/8”, 1/4″, and 3/8”
  • Paper Towels

Machines: Silhouette Cameo; Sizzix Big Shot, with two cutting plates and the magnetic platform.

Have a BEAUTIFUL Day!

Diane

Happy Father’s Day

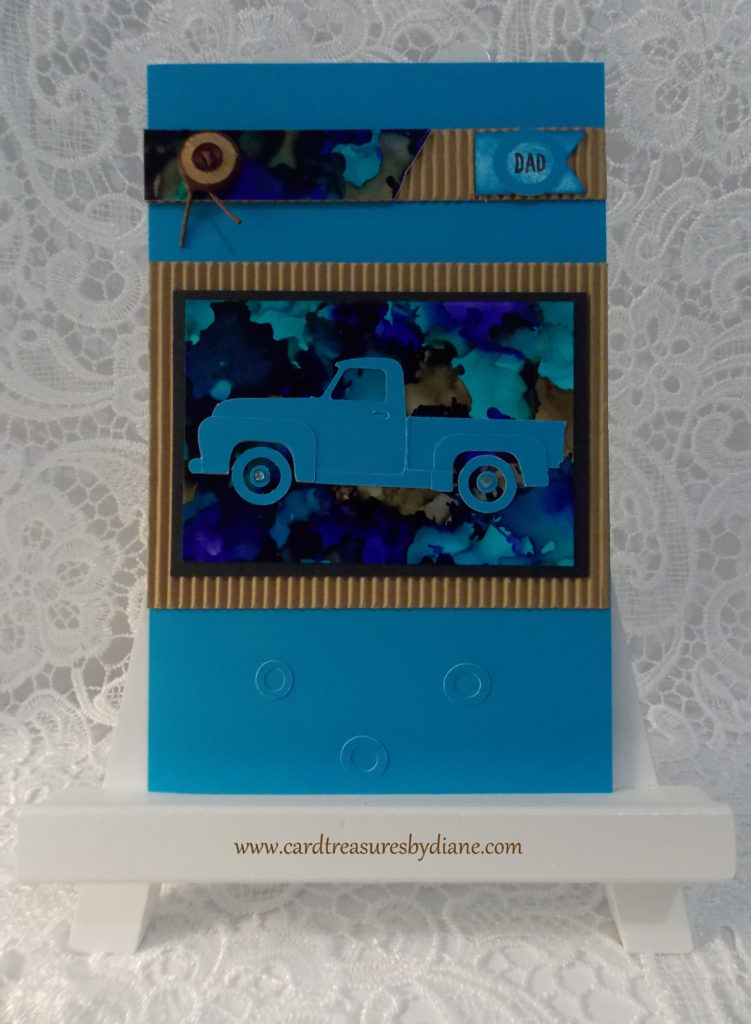
I created this card using alcohol inks and a design from the Silhouette Design Store.

Happy Father’s Day to all you incredible and inspirational fathers!!!

Materials Used:

  • Tim Holtz Alcohol Ink Yupo Paper, Translucent
  • Corrugated Cardstock
  • Black, Turquoise, and White Cardstock (the white is for the banner sentiment)
  • Silhouette Design Store, Old Pickup Truck, Design 193267
  • Pink and Main, Awesome Family Clear Stamp Set, PM0220
  • Ranger Alcohol Inks: Amethyst, Oregano, Patina, and Stream
  • Giottos AA1900 Rocket Air Blaster, LARGE (to control the direction of the alcohol inks)
  • Ranger Tim Holtz Distress Ink: Mermaid Lagoon (on the banner sentiment)
  • Ranger Tim Holtz Ink Blending Tool/Mini-Ink Blending Foam
  • Ranger non-stick Craft Sheet
  • Tim Holtz Tonic Stamp Platform
  • Fiskars Procision Rotary Bypass Trimmer (12”)
  • Martha Stewart Scoring Pad/Fiskars Dual-Tip Embossing Stylus
  • Memento Ink, Tuxedo Black
  • Fiskars Banner Punch, 1-1/4”
  • Ranger Multi Medium Matte (as an adhesive)
  • Ranger Glossy Accents (behind the button to anchor it)
  • Scor-Tape: 1/8”, 1/4”, and 3/8”
  • Vintage Button and Burlap String (I’ve found that thrift stores are an excellent source for buttons.)
  • 2 – Faux Gemstones
  • Krylon Kamar Varnish (to seal the alcohol inks)
  • Ranger Craft Scrubbie
  • Baby Wipes and Paper Towels

Machine: Silhouette Cameo

Have a WONDERFUL day!!!

Diane

Sweet Fleur

I created this card using Picked Raspberry Distress Oxide, Copics, the Spellbinders Floral Ovals die, and Lavinia stamps.

I used Memento ink to stamp the fairy, Fleur, onto a piece of X-Press It Blending Card; then colored her with Copics. A little shimmer was added with Wink of Stella. Next, came the difficult part. I stamped the fairy image on another piece of Blending Card to use as a practice sheet. I tried using the mini-ink blending tool to put distress ink around the image, with and without water. That didn’t work. Distress oxide didn’t either using the tool. I didn’t have any success using paintbrushes. Then, I remembered that I had bought some wedge cosmetic sponges, so I sponged the distress oxide very carefully around the fairy with that. I found that the paper didn’t really appreciate water, so I wet the sponge with just a few drops of water.

(If Lavinia Stamps ever comes out with dies for her stamps, I’ll be the first in line (via online) to get them. I’d be the first in line physically, but I don’t live in England…although some of my ancestors did. That may be why I have a fascination for England. No wait, that started with The Beatles when I fell in love with Paul.)

I used the Floral Ovals Spellbinders die and my Big Shot to cut out the fairy image; then stamped the See a Fairy, Make a Wish verse on another piece of Blending Card; attached the fairy die cut to it with Scor-Tape and Multi Medium Matte; and anchored this on a pink cardstock base.

I did press my luck when I had finished the card by using a Copic Multi Liner to darken some of the black areas that the distress oxide had lightened to grey-liked the lightened effect on the flower stem but not the fairy since she had other colors on her.

I debated on whether or not to use the Micro Distress Glaze to seal the distress oxide. The die cut area had a softer, pastel look that I liked. I decided to use it anyway, which seemed to brighten the fairy image. But, it did take away the chalk-like look of the distress oxide. At this point, I knew it was time to head to bed…to put down the card, slowly back away, take a breath, and say “Good enough!”

Materials Used:

  • X-Press It Blending Card
  • Pink Cardstock
  • Ranger Distress Oxide: Picked Raspberry
  • Copics: Pink-FRV1, RV06; Blue-FBG2, B04; Skin Tones-E00, E21, R02
  • Lavinia Stamps: Fleur and See a Fairy, Make a Wish (Tracey Lavinia Dutton is the artist of the Lavinia stamps.)
  • Spellbinders Nestabilities, Floral Ovals, S4-356
  • Memento Ink, Tuxedo Black
  • Zig Wink of Stella Brush
  • Cricut Weeder Tool
  • Copic Multi Liner, 0.3
  • Tim Holtz Tonic Stamp Platform
  • Fiskars Procision Rotary Bypass Trimmer (12”)
  • Martha Stewart Scoring Pad/Fiskars Dual-Tip Embossing Stylus
  • Ranger non-stick Craft Sheet
  • Ranger Multi Medium Matte
  • Tim Holtz Micro Distress Glaze
  • Scor Tape: 1/2″ and 3/8”
  • Baby Wipes and Paper Towels

Machine: Sizzix Big Shot, with two cutting plates and the magnetic platform.

Thanks for stopping by! Have a Fairy good day!!!

Diane

Wildflowers-Alcohol Ink

I created this card using Wild Plum/Amethyst Alcohol Inks, rubbing alcohol, and Tim Holtz Wildflower dies.

I was checking out alcohol ink Pinterest posts and came across the You-Tube video, Myriam’s Nature, Alcohol Inks: Airy, Silky, Wispy Looks-Full Tutorial. She makes beautiful designs with alcohol inks. I decided to try to create a card using her techniques. I wasn’t able to achieve quite the same wispy look that she did, but I know that will take practice.

Using the techniques from her video, I filled three one-ounce squeeze bottles 3/4 full with rubbing alcohol. I put Wild Plum alcohol ink in one bottle and Amethyst in the second bottle (approximately 12-15 drops of each). The third bottle had only the rubbing alcohol in it.

I taped around a piece of Dura-Lar film that I had put on a porcelain tile and Lazy-Susan turntable. Using the Lazy-Susan worked really well because that enabled me to turn the paper in different directions, as I was using the heat tool, and kept the alcohol ink moving.

I squeezed a couple large drops of the Wild Plum rubbing alcohol mixture onto the Dura-Lar film and added a ring of rubbing alcohol around each drop; used my heat gun to blow the ink around; and repeated the process with the Amethyst squeeze bottle. I did this for a bit and noticed that the bottle containing just the rubbing alcohol was leaking all over around the cap, so I continued the process with just the Wild Plum and Amethyst ink squeeze bottles. When I wanted to change the look of an area, I just added some rubbing alcohol, waited a couple seconds, and used my heat gun to move the ink around.

Once I had finished adding all the alcohol ink, and it had dried (quickly), I attached the Dura-Lar film to the white cardstock frame with Scor-Tape. I added a piece of white cardstock behind this because the Dura-Lar was very translucent and the muted colors didn’t show up very well without it. This was anchored to  Lilac cardstock ; Ranger Multi Medium Matte was used as an adhesive for the wildflower die cuts; and the card was finished. I didn’t add a sentiment on the front of the card-that way it can work for  a variety of occasions in the future.

Note of Frustration: I had found the white cardstock frame in my Scraps container. I couldn’t find a die to match it, so I think it’s from a die cut that had gone wrong-one with details that didn’t show up when I ran it through my Big Shot. I guess it must have been meant for this card.

I like how this process gives the alcohol inks a different look-kind of a pastel, softer look. What do you think?

Materials Used:

  • Strathmore Watercolor Paper, Cold Press, 90 lb.
  • White Cardstock
  • Lilac Cardstock Base
  • Grafix Dura-Lar Film, Matte .005, Clear
  • Sizzix Tim Holtz Thinlits, Wildflowers, 661190
  • Ranger Alcohol Inks: Wild Plum and Amethyst
  • 91% Isopropyl Rubbing Alcohol
  • Three 1 oz. Squeeze Bottles
  • Clear Tape, Non-Permanent
  • Ranger Multi Medium Matte
  • Porcelain Tile, 9” x 12” (I found mine at Menard’s.)
  • Lazy Susan Turntable, approx. 14” (Walmart)
  • Fiskars Procision Rotary Bypass Trimmer (12”)
  • Martha Stewart Scoring Pad/Fiskars Dual-Tip Embossing Stylus
  • Darice Heat Tool
  • Scor-Tape: 1/8”, 1/4″,and 3/8”
  • Rubber Gloves, Baby Wipes, and Paper Towels

Machine: Sizzix Big Shot, Extended Multipurpose Platform, Extended Thin Die Adapter, with two cutting plates.

Have a fantastic day!!!

Diane