By the Sea

I created this card using Distress Oxide inks, Copic Opaque White, and Stickles.

I made this card for my oldest son’s birthday. We’ve traveled three times to the ocean on vacations. My amazing son VOLUNTEERED to take me with him for nine days at a time every vacation. We also traveled to the Grand Canyon-that could be an interesting card.

I like how the waves look, but they didn’t work out in one sense. When the card was finished, I touched a couple of the waves. The Opaque White rubbed off. I’ve seen videos where it’s being used to highlight areas, and the end result looked really good. I think either the area I was trying to do was too large, or maybe it just didn’t work on top of distress oxides. Next time, I’m going to try using white acrylic paint and see how that turns out.

Since I couldn’t think of a way to seal the Opaque White, my solution will be to put this in a white picture frame and give it to my son that way.

Materials Used:

  • Strathmore Watercolor Paper, Cold Press, 140 lb.
  • Aqua Cardstock Base
  • Ranger Tim Holtz Distress Oxides-Sky: Tumbled Glass; Sea: Broken China, Mermaid Lagoon, and Peacock Feathers; Sand: Tea Dye and Antique Linen
  • Ranger Stickles: Sea Glass, Crystal, Peacock, and Turquoise
  • Copic Opaque White and a toothbrush and Fan paint brush
  • Ranger Heat It Craft Tool
  • Ranger Mister
  • Ranger Tim Holtz Mini Ink Blending Tool with Foam
  • Fiskars Procision Rotary Bypass Trimmer (12”)
  • Martha Stewart Scoring Pad/Fiskars Dual Tip Embossing Stylus
  • Scor-Tape: 3/8”
  • Baby Wipes/Paper Towels

I wish you a day filled with peace and tranquility!!!

Diane

Lace Dress-Leave a Trail of Glitter

This card was created using lace, a design from the Silhouette Design Store, and a sentiment from Hampton Art.

I cut out the dress design with my Cameo and used that as a base for the dress; attached a piece of lace; and stamped the sentiment. A sequin was added and a few beads at the bottom of the dress. (It’s kind of hard to see those.)

Materials Used:

  • Black Cardstock
  • Core’dinations Cardstock Base, Bright White
  • 1956 dress, Design 64122-Silhouette Design Store
  • Hampton Art ‘Butterflies’ Clear Stamp, Jillibean Soup, jb0199 (Sentiment)
  • Lace
  • Fiskars Procision Rotary Bypass Trimmer (12”)
  • Martha Stewart Scoring Pad/Fiskars Dual Tip Embossing Stylus
  • Tim Holtz Tonic Stamp Platform
  • Memento Ink, Tuxedo Black
  • Scor-Tape: 1/4″ and 3/8” (to attach the lace to the back of the dress and the dress to the white cardstock)
  • Ranger Multi Medium Matte-Bottle (to adhere the dress straps and a base for the glitter on the stars)
  • Ranger Glossy Accents (to adhere the beads and sequin)
  • Ranger Tim Holtz Distress Glitter, Tumbled Glass (stars)
  • Beads and Sequin
  • Microbrushes (I used these to apply the ‘glue’ to the dress straps, the beads, sequin, and stars)

Machine: Silhouette Cameo with a Silhouette 12” cutting mat.

Have a Beautiful day!!!

Diane

Enchanted Sea

I created this card using Mermaid Lagoon and Salty Ocean distress oxide inks, Lavinia Stamps, and a die from My Favorite Things Stamps.

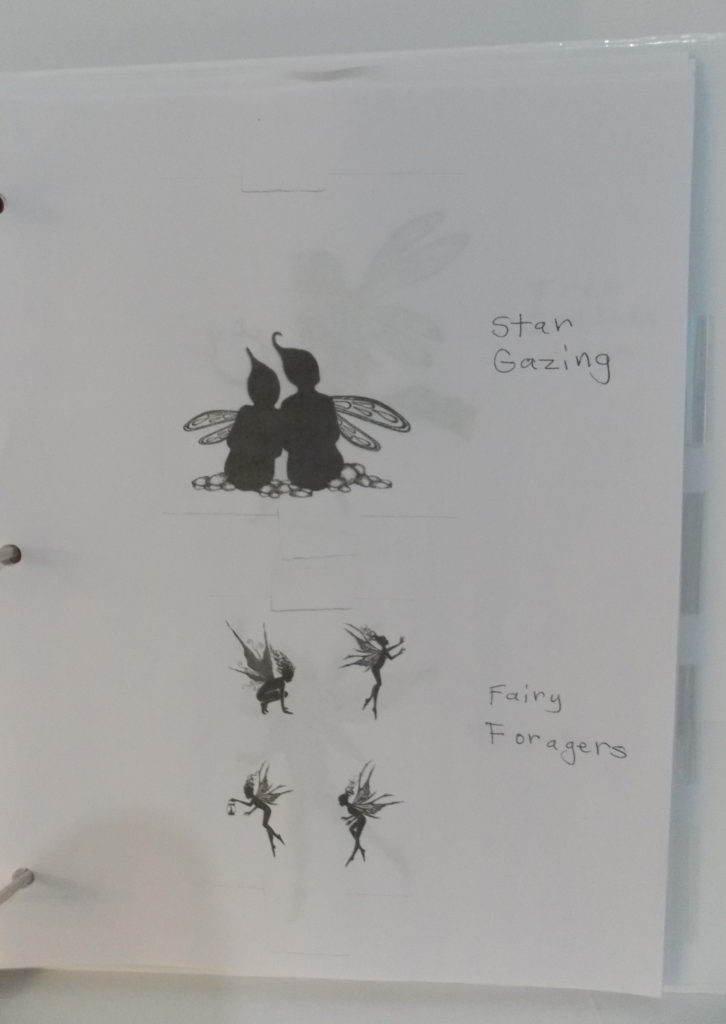
I’ve entered this card in the August Lavinia Stamps Challenge. This month’s theme is Stamping With Blues, so I thought of the ocean and a mermaid. I just LOVE the new Fairy Foragers stamps (two of the fairies are stamped at the top of this card). There are four miniature fairies in this set. I find it amazing that these stamps are tiny but still have such intricate detail.

When I figure out, stumble upon, or learn something that makes my stamping/creating life easier, I like to pass it along to you:

I made a 3-ring binder of the Lavinia stamps that I have. The stamps come with the images printed on pieces of clear film. The exception: ‘Pound’ stamps-they generally don’t come with a stamped image on the film, so I just stamp them with ink onto a sheet of paper.

To make the binder, I used removable tape and put two of these images on a sheet of paper; copied it on my printer; and wrote the name of the stamps in the margin. This binder gives me a quick overview of the stamps I have available and makes it easier for me to visualize the card that I want to create. Also, in my case, I don’t need to keep returning to the Lavinia website for the exact name of the stamps (which is dangerous because I always want to buy more!).

Quite a while ago, I bought a box of clear transparency film. I’ve found three good uses for it. The stars on this card are actually from two different stamps. I wanted the stars above Guinevere’s hand to look like they were flowing into the larger star cluster.

I had already put ink on the Stars Miniature stamp for another card. Even though I had cleaned it, I was concerned about some of the ink remaining on the stamp and getting on the paper before it was positioned. I put a piece of transparency film under the stamp and could clearly could see where I wanted to position the stamp. I lowered the cover of the stamp platform to pick it up; took off the transparency film; inked the stamp; and it stamped exactly where I wanted the image.

I also used a piece of transparency film at the bottom of the card as a mask and held it in place with blue painter’s tape. Being that the film is clear, I could easily see the bottom of the left thistle and line up where I wanted the bottom of the right thistle to be. (The transparency film served as a mask to cover a large portion of the thistle stamp’s stems.) When I was done, I just wiped off the ink on the film with a baby wipe.

Some stamps don’t come with pieces of film behind them. Then, I cut a piece of transparency film and put it behind the stamp-it slides easily in and out of my stamp storage binder.

I went online…it looks like the brand of transparency film I have is no longer available (3M Transparency film for Color Laser Printers, CG3700). I was happy to see that there are still other brands out there.

Materials Used:

  • Strathmore Watercolor Paper, Cold Press, 140 lb.
  • Dark Blue Cardstock Base
  • Lavinia Stamps: Guinevere, Fairy Foragers, Fairy Thistles, Star Cluster, and Stars Miniature (Tracey Lavinia Dutton is the artist of the Lavinia stamps.)
  • My Favorite Things Die-namics, Ocean Waves, MFT-1111
  • Ranger Tim Holtz Distress Oxides: Mermaid Lagoon and Salty Ocean
  • Tim Holtz Tonic Stamp Platform
  • Ranger non-stick Craft Sheet
  • Ranger Mister
  • Ranger Tim Holtz Mini Ink Blending Tool with Foam
  • Fiskars Procision Rotary Bypass Trimmer-12” (I’ve saved a lot of money with this purchase. It was spendy, but I used a 60% off coupon at Michael’s. It’s self-sharpening-no more buying blades or ruined cardstock.)
  • Martha Stewart Scoring Pad/Fiskars Dual-Tip Embossing Stylus
  • Anita’s All Purpose Acrylic Craft Paint, White
  • Memento Ink, Tuxedo Black
  • Scor-Tape: 3/8”
  • Baby Wipes
  • Ranger Craft Scrubbie

Machine: Sizzix Big Shot, with two cutting plates and the magnetic platform.

‘Just 5 percent of the Earth’s oceans have been explored and charted-National Ocean Service, April 18, 2018.’ In this world’s infinite magical possibilities, I believe mermaids could exist…and that they would be beautiful, gentle, and kind. My Granddaughter once swore up and down that she saw one by the sea…and I believe her!

Have a magical day!!!

Diane

Wolves Among the Stars

I created this card using Mermaid Lagoon and Salty Ocean distress oxide inks, white acrylic paint, and a design from the Silhouette Design store.

It’s my Grandson’s birthday soon, and he LOVES Wolves!!!

I started the card by cutting out the wolf image twice with my Silhouette Cameo. (I flipped the second image in the opposite direction on the card.) Next, I smooshed the watercolor paper into Mermaid Lagoon distress oxide, dried it with my heat gun, and did the same with the Salty Ocean.

Here it gets a little hazy… I think I started to get a little frustrated because it wasn’t the look I was going for. I wanted variation in the sky, but I also wanted it to have a more solid look-and it wasn’t happening.  I believe, at this point, I used my mini blending tool to apply both oxides on top of the smooshed distress oxides. I think I also used the heat gun in between each oxide. 

To make the stars, I flicked white acrylic paint off a paintbrush. This time, I did learn that if the paint starts to get thick on the paintbrush, that I need to use a new one. The paint does splatter (a lot!) during this process so I placed the cardstock in an inexpensive dishwashing pan. (A cardboard box would work, too.)

Scor-Tape was used to anchor the wolves, as well as the watercolor paper to the black cardstock base.

Materials Used:

  • Strathmore Watercolor Paper, Cold Press, 140 lb.
  • Black Cardstock
  • Core’dinations Cardstock Base, Bright White
  • Ranger Tim Holtz Distress Oxides: Mermaid Lagoon and Salty Ocean
  • Howling Wolf (Design 13356)-Silhouette Design Store
  • Ranger non-stick Craft Sheet
  • Ranger Tim Holtz Mini Blending Tool with Blending Foam
  • Ranger Mister
  • Ranger Heat It Craft Tool
  • Anita’s All Purpose Acrylic Craft Paint, White
  • Paintbrush
  • Fiskars Procision Rotary Bypass Trimmer (12”)
  • Martha Stewart Scoring Pad/Fiskars Dual Tip Embossing Stylus
  • Tim Holtz Micro Distress Glaze (to seal the distress oxides)
  • Scor-Tape: 1/8”, 1/4″, and 3/8”
  • Baby Wipes

Machine: Silhouette Cameo with a Sihouette 12” cutting mat.

Have a day filled with wonderful things!!!

Diane

Pink Polka Dot Dress

I created this card using a dress design from the Silhouette Design Store, lace, sequins, and a Stampabilities sentiment.

I’ve had the urge to make a dress card for quite a while. I cut out the dress with my Cameo; sealed the ends of two pieces of lace with clear nail polish (so they wouldn’t unravel); and anchored one piece of the lace to the front of the dress with Ranger Multi Medium Matte.

The sentiment was stamped on a paper scrap and adhered to the dress with Scor-Tape. The dress and the lace, at the waist on the back, were attached to the grey cardstock using this tape. I cut a strip of polka dot paper and placed the other piece of lace on top of that-using Scor-Tape on the paper, Multi Medium Matte on the lace. I needed to hold the lace in place while it dried, but it didn’t take very long. The grey cardstock was also attached to the white cardstock base with Scor-Tape.

I added some silver sequins to the card, using Ranger Glossy Accents to secure them, and the card was finished!

Materials Used:

  • Core’dinations Gemstones Cardstock, Tanzanite (Grey)
  • Core’dinations Cardstock, Light Pink Small Dot
  • Core’dinations Cardstock Base, Bright White
  • 1952 dress, Design #64118-Silhouette Design Store
  • Stampabilities ‘Celebrate You’ Rubber Stamp, CR1131
  • Ranger Archival Ink, Color: Watering Can
  • Fiskars Procision Rotary Bypass Trimmer (12″)
  • Lace
  • Silver Sequins
  • Clear Nail Polish
  • Scor-Tape: 1/8”, 1/4″, and 3/8”
  • Ranger Multi Medium Matte (bottle). I used a micro brush to spread the glue evenly.
  • Ranger Glossy Accents

Machine: Silhouette Cameo with a Silhouette 12” cutting mat.

Thanks for stopping by! Have a beautiful day!

Diane