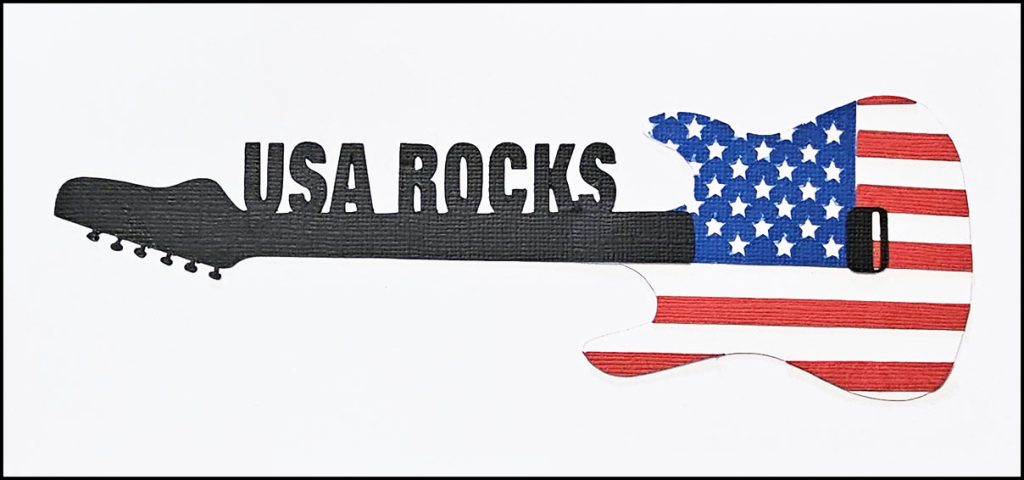
I created this card using a design from the Silhouette Design Store.
Wishing you a wonderful July!!!
To begin the card, I cut out the design with my Cameo 4; then used Scor-Tape and Multi Medium Matte to adhere the pieces of the guitar and attach the guitar to the cardstock base.
Materials Used:
Core’dinations Sand it, Tear it, Emboss it, Love it, Royal
Bazzill Cardstock, Red Devil
Core’dinations Cardstock, Jet Black
Park Lane Solid Core, 65#, White Cardstock (Joann’s)
USA Rocks Guitar, Design #29425-Silhouette Design Store
Ranger Multi Medium Matte
Scor-Tape, 1/8”, 1/4″, 3/8”
Machine:
Cameo 4
Thanks for stopping by my website! Hoping you have a day filled with beautiful moments!!!
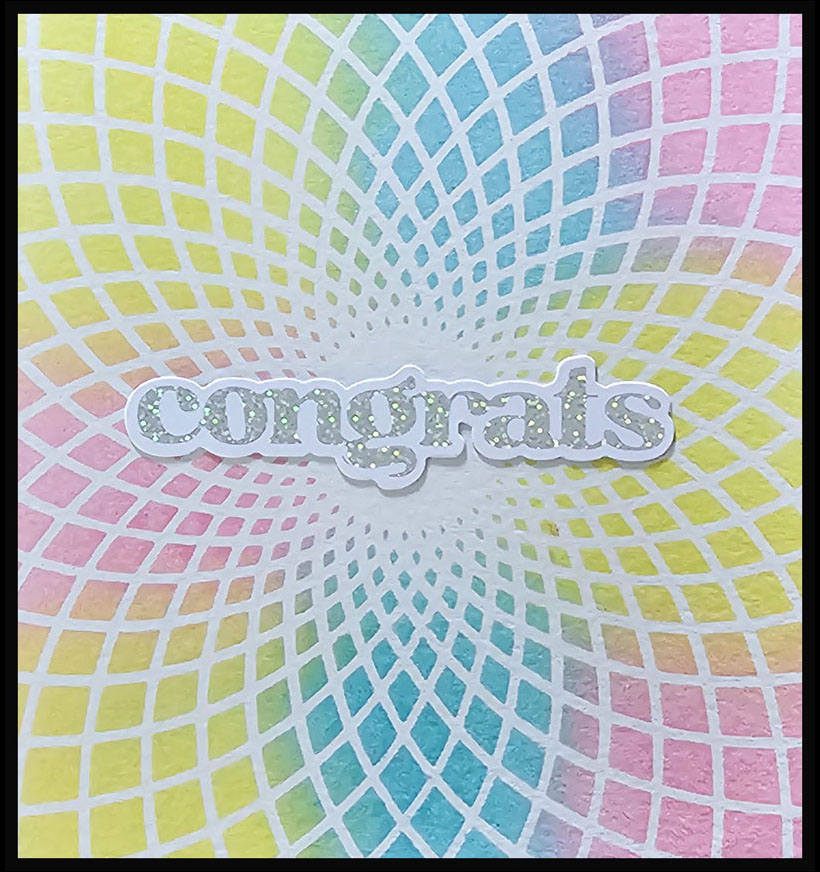
I created this card using a stencil and hot foil sentiment from Altenew and Ranger Tim Holtz Distress Inks.
I hope you’re having a beautiful day!!!
To begin the card, I put a piece of cardstock on a (8”x10”) gel plate to hold the cardstock securely. I placed the stencil on top and added a piece of low-tack painter’s tape, on the top and bottom of the stencil, to secure it. (I have a separate gel plate that I use specifically for this.)
Next, I put a strip of each distress ink color on my glass media mat; spritzed them with water; and applied the distress inks to the stencil using TH Blending Tools. I carefully pulled the stencil off and immediately put it in a small container of water to clean it. To clean the gel plate, I put it beneath the cold water kitchen faucet. The distress inks came off easily.
I used my Spellbinders Glimmer Hot Foil System to foil the sentiment and my Big Shot to die cut it. Spellbinders Paper Arts has a ‘Glimmer Hot Foil System Quick Start Guide‘ that explains this process.
To finish the card, I attached the sentiment to the cardstock using Scor-Tape, followed by the cardstock to a black cardstock base.
I created this card using a design from the Silhouette Design Store, a sentiment and stencil from Altenew, Tim Holtz Distress Ink, and Spellbinders Silver Holographic Facets Hot Foil.
It’s a proud moment when a grandchild graduates from high school. But, it’s also a moment when you think ‘Where has the time gone?’ Two of my grandchildren have graduated now. It’s like one moment they’re little, and boom, the next, they’re walking across the stage to accept their diplomas. I’m about to sing a song from Fiddler on the Roof, so I’d better move (quickly) on…
To start the card, I placed a piece of Strathmore Watercolor Paper on a gel plate, followed by the Classy Stripes stencil. I put a strip of Ripe Persimmon Distress Ink on my glass media mat, spritzed it with a little water, and applied the ink to the stencil using a Mini-Ink Blender Tool. I’ve found that the 8 x 10” gel press plate is a good size when using stencils, and it keeps them secure. The distress ink washed off easily from the gel plate (holding it under the faucet), but I haven’t tried other inks yet to see if they’re harder to remove from it.
Next, I cut out the grad hat/diploma design with my Cameo 4, then used Scor-Tape and Multi Medium Matte to adhere the pieces to the cardstock.
I used Silver Holographic Facets hot foil and the Congrats from the Altenew Versatile Greetings 2 Hot Foil Plate set to create the sentiment. This set included sentiments as well as their shadow dies. I’m new to hot foiling so I don’t feel I can explain the technique effectively yet. I’m still learning. I do like the feeling of success, when I’ve pulled the foil away from the cardstock, and achieved a perfectly foiled result. But, I’ve had many fails too. I did discover that the Tim Holtz Titanium shears cut through the foil easily so that was a plus.
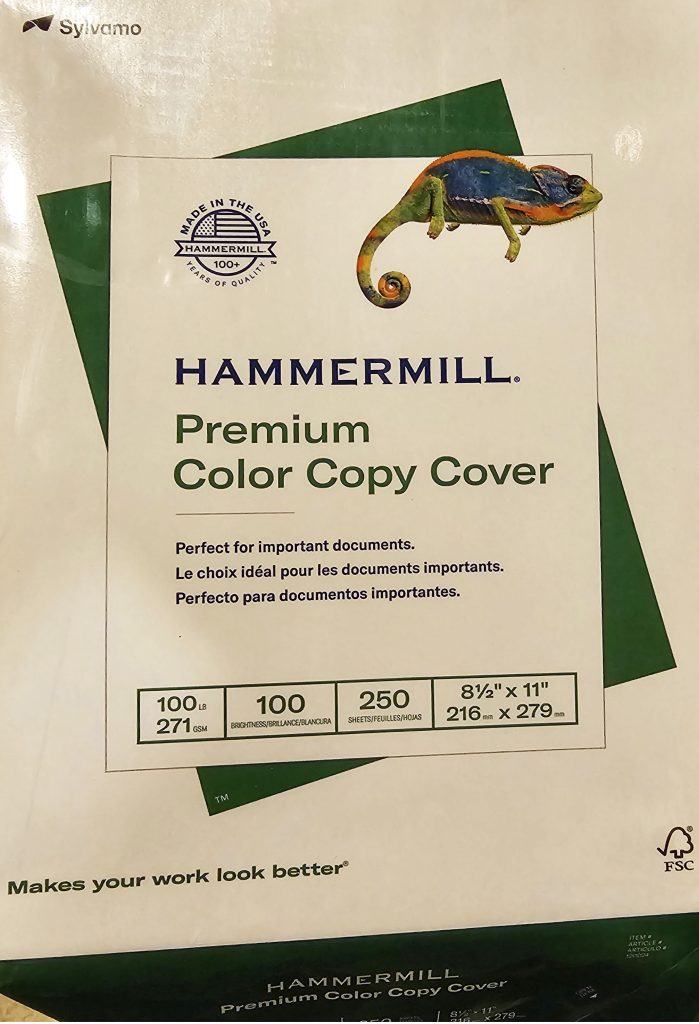
After researching, I did find a cardstock that gives me really good results for hot foiling:
I purchased mine from Amazon at a reasonable price, considering the quantity. There are different Hammermill varieties, but I found that the ream with the Geico in the upper right corner has worked out very well for me.
I cut out the hot foiled sentiment with its shadow die and attached it to the cardstock using Scor-Tape. I adhered a couple thin strips of Opulant Opal cardstock, above and below the sentiment, using Multi Medium Matte. I added orange cardstock, followed by a black cardstock base to finish the card.
Materials Used:
Strathmore Watercolor Paper, Cold Press, 140 lb.
Bazzill Cardstock, Bazzill Orange
Core’dinations Cardstock Base, Sand it, Tear it, Emboss it, Love it, Black Magic Collection
Park Lane Paperie, 110 lb., White Core, Smooth (for the diploma)
Hammermill Premium Color Copy Cover, 100 lb.
Core’dinations Cardstock, Opulant Opal
Altenew Classy Stripes Stencil
Altenew Versatile Greetings 2 Hot Foil Plate Set
Graduation Cap and Diploma, Design #437581-Silhouette Design Store
Spellbinders Glimmer Hot Foil System Glimmer Foil, Silver Holographic Facets
Tim Holtz 9.5” Tonic Titanium Shears
Gel Press Gel Printing Plate, 8 x 10
Ranger TH Distress Ink, Ripe Persimmon
Tim Holtz Glass Media Mat
Ranger Multi Medium Matte (as an adhesive)
Ranger TH Mini-Ink Blending Tool/Foam
Ranger Mister
Scor-Tape: 1/8”, 1/4”, 3/8”
Machines Used:
Silhouette Cameo 4, with Silhouette Cameo Cutting Mat
Sizzix Big Shot
Spellbinders Glimmer Hot Foil System
Thanks for stopping by my website! Have a Beautiful Day!!!
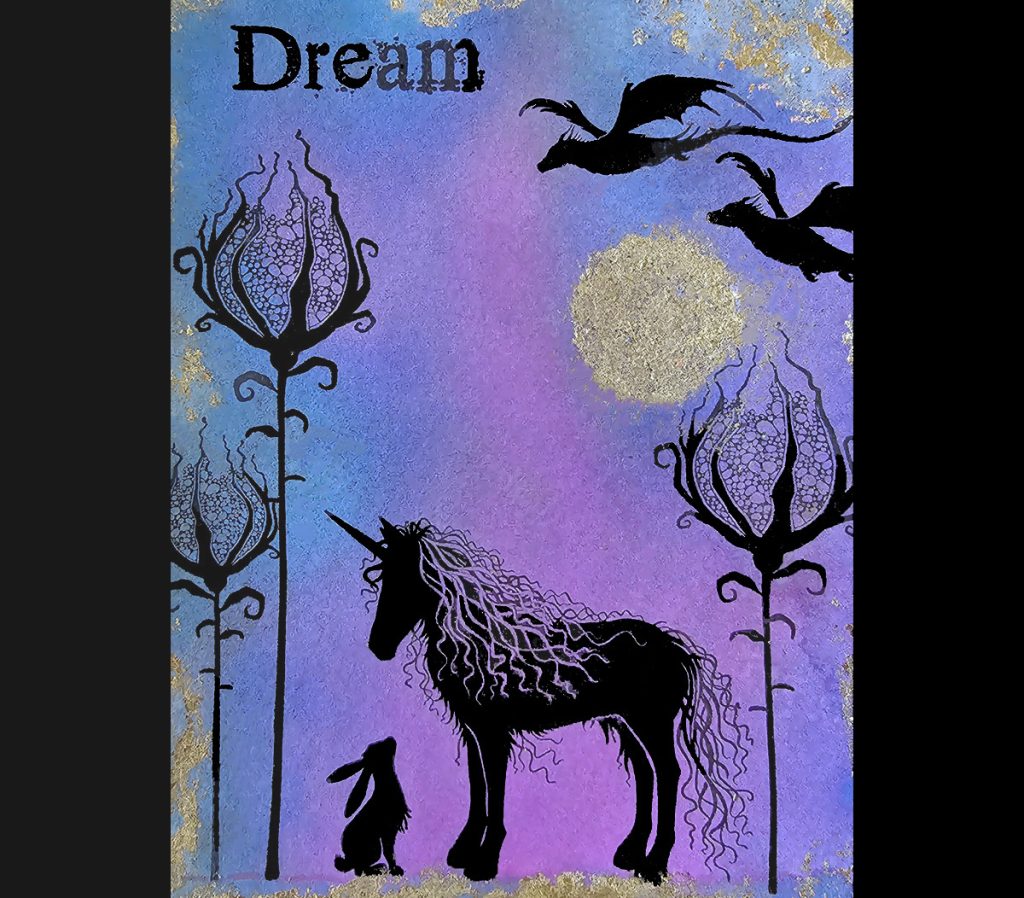
I created this card using Lavinia Stamps and Lavinia Stamps Dinkles.
This has been such an amazing winter! There was a really challenging ice storm and a two-week time period of intense temperatures in the -20 to -40 range. In Minnesota, we’re used to way below zero temps, but they’re usually not for a solid two weeks at a time. Here’s the amazing part… last winter we received 22 inches of snow in December; this year, only two inches. Some temps have also been at record highs. Just an amazing and unusual winter in Minnesota.
To begin the card, I sprinkled Lavinia Dinkles over the surface of the cardstock paper. I spritzed the Dinkles with water and lifted and tilted the paper to move the inks around. After the paper had dried, I stamped the images with VersaFine Clair Nocturne Ink. I used a Lilac colored pencil on Starr’s hat, hair, and skirt, then added sparkle with a clear Gelly Roll pen. To create a focal point, I highlighted the lantern with a yellow Uni Posca Paint Marker. To finish the card, I attached the cardstock to a black cardstock base.
Materials Used:
Strathmore Watercolor Paper, Cold Press, 140 lb.
Core’dinations Cardstock Base, Jet Black
Lavinia Stamps: Starr, Red Pine Large, Red Pine Small, Wild Hares Set Small (Tracey Lavinia Dutton is the artist of the Lavinia stamps.)
Lavinia Stamps Dinkles: Blue Dragon, Amethyst, Pink, Periwinkle, Sea Blue
VersaFine Clair Ink: Nocturne
Prismacolor Premier Colored Pencil, Lilac, PC 956
Uni Posca Paint Marker, PC1M.2, Extra Fine Point, Yellow
Sakura Gelly Roll Pen, Clear
Tim Holtz Stamp Platform
Tim Holtz Splat Box-to protect the surrounding area (a regular cardboard box would also work)
I created this card using stamps from My Favorite Things Stamps and a background print from the Silhouette Design Store.
I originally bought my Cameo 4 just to cut out designs. I purchased the Silhouette Designer Edition and signed up for a monthly Silhouette Design Store subscription. Recently, I found another use for my subscription-the ability to print off backgrounds on cardstock. Plus, I appreciate that there’re so many designs to choose from in the Silhouette Design Store.
To begin the card, I printed Design #396015 on a piece of 65 lb. Astrobrights cardstock. I’ve found that weight, along with the surface of this cardstock, feeds easily through my ET-3830 printer. (The ink for this printer comes in bottles and lasts for an amazingly long time. It’s such a relief not to worry about how much ink I use when I print something.)
Next, I stamped the bunny image (so cute!) and sentiments, using Nocturne Versa-Fine Clair ink. To finish the card, I used Scor-Tape to attach the printed cardstock to the gray cardstock base.
Materials Used:
Astrobrights Premium Smooth Cardstock, 65 lb.
Core’dinations Sand it, Tear it, Emboss it, Love it Cardstock, Stormy Gray
My Favorite Things Stamps: RAM Number Fun-1
Baby Pink and White Shabby Valentine Monoprint Background Pattern, Design ID #396015-Silhouette Design Store
Tim Holtz Stamp Platform
VersaFine Clair Ink, Nocturne
Scor-Tape: 1/4″
Thanks for stopping by my website! Have a Beautiful day!!!
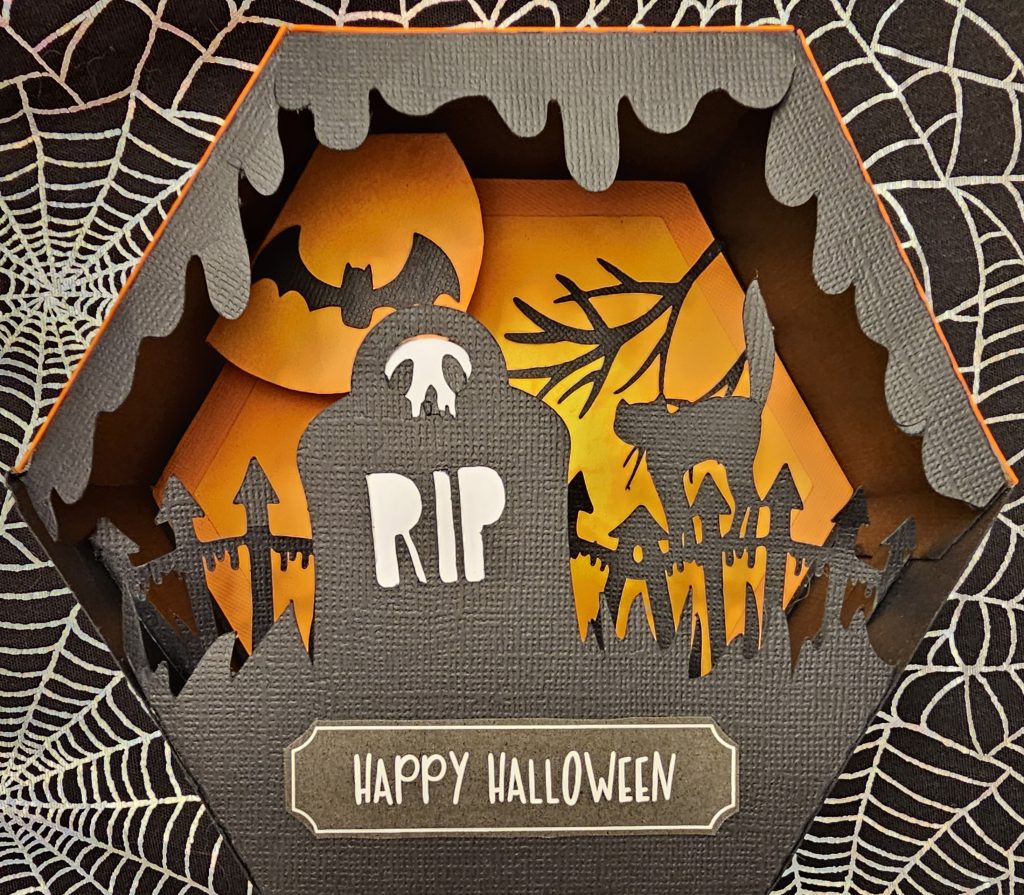
I created this shadowbox using Tim Holtz Distress Inks and a design from the Silhouette Design Store.
Happy Halloween!
To begin the project, I cut out the pieces of the design with my Cameo 4. I applied Mustard Seed, Carved Pumpkin, and Crackling Campfire Distress Inks to the background piece, as well as the moon, with a Mini Ink Blending Tool. I used Scor-Tape to adhere the shadowbox pieces together, and Multi Medium Matte to adhere the remaining pieces such as the bat to the moon. To finish the card, I printed the Happy Halloween sentiment/strip, which was included with the design, on my printer and adhered it with Multi Medium Matte.
Materials Used:
Park Lane Paperie, White, Solid Core, Smooth 110 lb., 12” x 12”
Core’dinations Cardstock, Jet Black
Halloween Shadow Box with Tomb and Cat, Design #305737-Silhouette Design Store
I created this card using stamps from My Favorite Things Stamps and Tim Holtz Distress Mica Stains.
The summer just flew by. It seemed like I blinked and it was gone!
To begin the card, I placed a piece of watercolor paper in a Tim Holtz Splat Box, then sprayed the two mica stains over the surface of the paper. After it dried, I stamped the adorable Hunny Bunny and sentiment, using Nocturne VersaFine Clair ink.
To make the rainbow background, I inked the stamp using Paradise VersaFine Clair ink; then placed it on Multifarious Cardstock. This cardstock provided me a really smooth surface.
I assembled the card and placed it on a black cardstock base.
Materials Used:
Strathmore Watercolor Paper, Cold Press, 140 lb.
Multifarious Card-Lavinia Stamps
Black Cardstock
My Favorite Things Stamps: Hunny Bunny (set includes the sentiment) and Repeating Rainbows Background
Ranger Tim Holtz Distress Mica Stains: Cocktail Party, Shiny Bauble
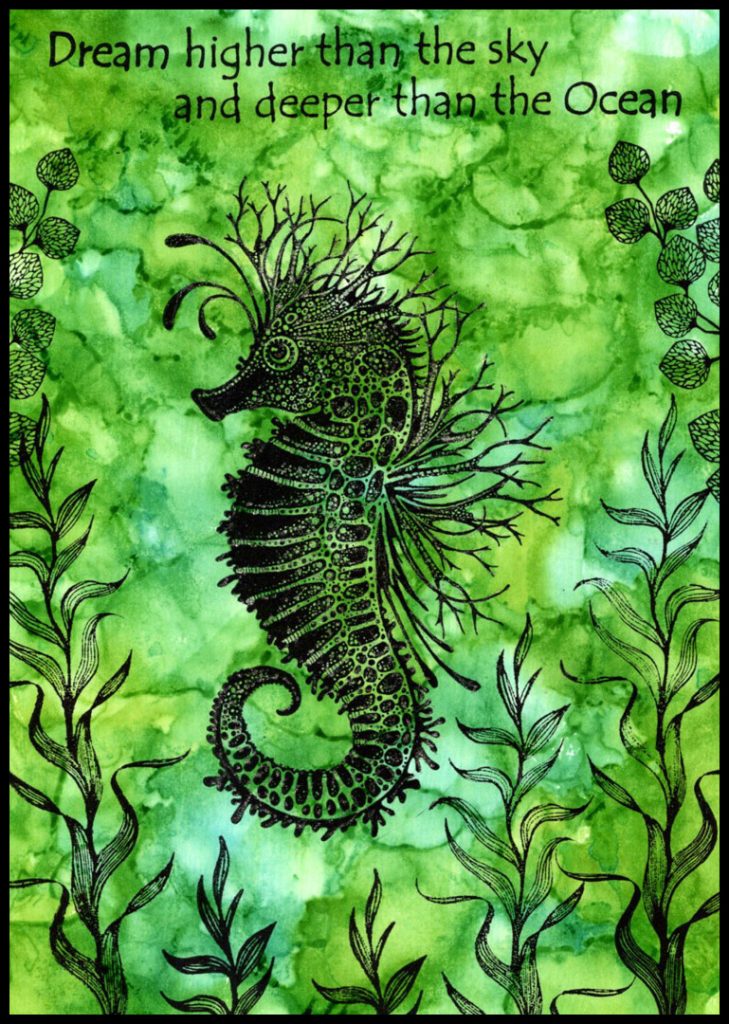
I created this card by using Lavinia Stamps, Ranger Tim Holtz Alcohol Inks, and Alcohol-Lift Ink.
I had always struggled to get a good stamped image on an alcohol ink background. I had looked online and hadn’t been able to find a way to effectively do it. Then I saw a video by Tracey Dutton, Lavinia Stamps, that showed a technique to transfer the inked background from Yupo paper to cardstock:
To begin my card, I put drops of Limeade and Patina alcohol inks on Yupo paper and used a Giottos Air Blaster to control the spread of the ink. I did a drop at a time, circling around each drop with the air blaster. (It’s important to use these Inks in a well-ventilated area.)
I put a line of Alcohol Lift-Ink at the top of the Yupo paper and used a brayer to spread it over the entire surface. I placed a piece of multifarious cardstock on top of the Yupo paper, smoothed it with my fingers, and pulled off a print.
The magic of the alcohol ink print on multifarious cardstock is it gives a really good surface to stamp images. Then I was able to stamp them successfully with Nocturne VersaFine Clair ink. Problem solved!!!
To finish the card, I attached the cardstock to a black cardstock base.
Materials Used:
Tim Holtz Alcohol Ink Yupo Paper, Translucent
Lavinia Stamps Multifarious Smooth and Supreme Cardstock, 330 gsm
Black Cardstock Base
Lavinia Stamps: Sebastian the Seahorse, Sea Flower, Marine Kelp, Deeper than the Ocean (Tracey Lavinia Dutton is the artist of the Lavinia stamps.)
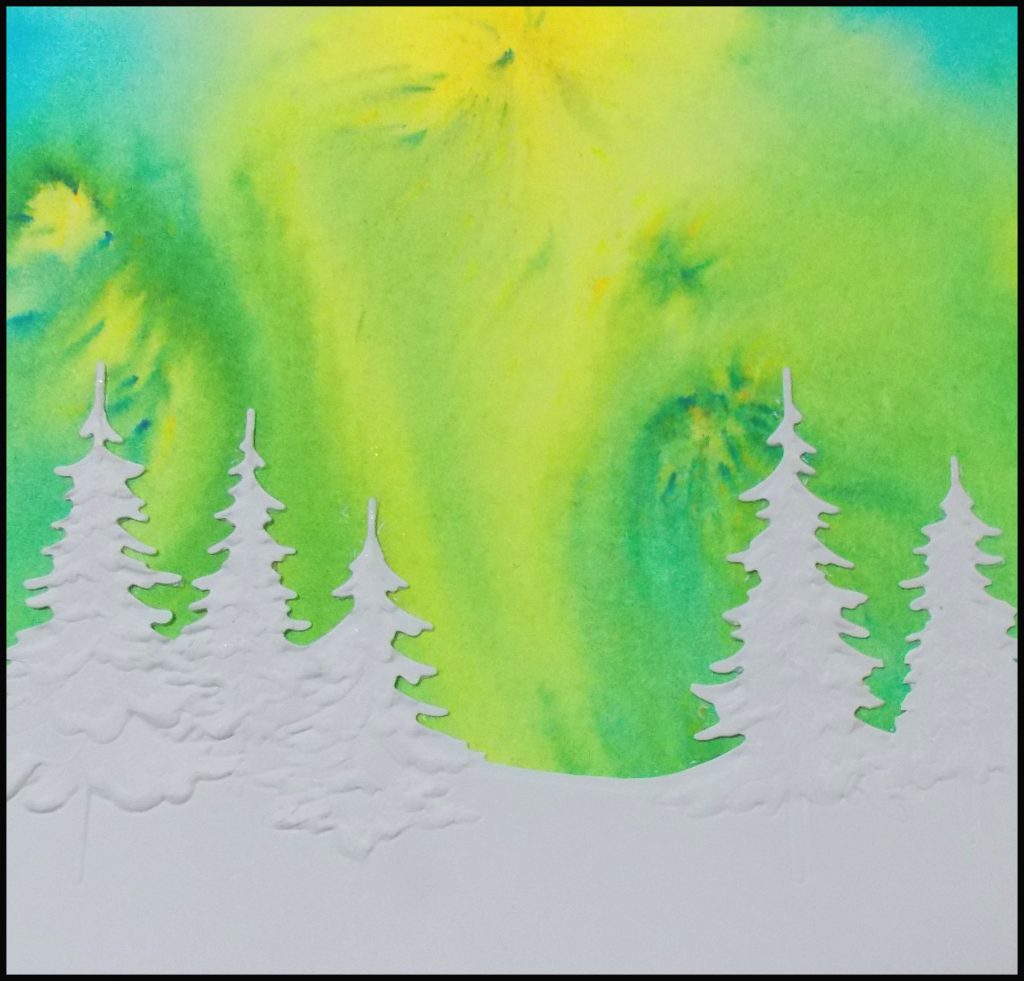
This card was created using Brusho Crystal Colours and a Simon Says Stamp Embossing Folder and Die set.
I wish you a day filled with sunshine!
It’s technically spring in Minnesota, but Mother Nature had other plans. Most of the snow had basically melted last week, but my yard was covered with 3 more inches this morning. It’s almost the end of April…I figure Mother Nature put it there, so she can also melt it.
It was a brutal, cold, and long winter, but it’s supposed to be consistently in the 50’s next week. I’m hopeful that spring will finally truly arrive and warmth will return once again.
To begin the background, I sprinkled Yellow and Turquoise brushos over the surface of the watercolor paper. I spritzed water upwards to create the sky, then lifted and tilted the paper so that the brushos and water ran towards the bottom of the paper. I put the background aside to dry.
The Pine Landscape set includes an embossing folder and a die. Because the embossing folder is thick, I misted a piece of cardstock before placing it in the folder. Misting softens the fibers and adds more dimension to the embossed image. I would normally use two cutting plates when running an embossing folder through a cutting machine. But, because of the thickness of the folder, I only used one. It was just too thick to run it through with two plates.
I placed the embossing folder directly on top of the Sizzix Extended Multipurpose Platform base, no Tabs; then a cutting plate on top of that and ran it through my Big Shot.
So, basically my sandwich was:
Sizzix Extended Multipurpose Platform base, no Tabs
Embossing Folder
Cutting Plate
I removed the embossed cardstock from the folder and let it dry a bit; then lined up the die to the embossed image and ran it through my Big Shot using the sandwich:
Extended Multipurpose Platform Base, plus Tab 1 and Tab 2
Cutting Plate
Cardstock and Die
Cutting Plate
To finish the card, I positioned the die cut trees on the brusho background and adhered it with Scor-Tape and Multi Medium Matte.