Tillie’s Baptism Card

I created this card using a design from the Silhouette Design Store, an Altenew stencil, and Cosmic Shimmer Glitter Kisses.

I wish you a beautiful day!

To create the mandala, I mixed some Lavender and Silver Chrome Glitter Kiss together on a glass media mat. I placed the Altenew stencil over a piece of Multifarious cardstock and secured it with a couple small pieces of blue low-tack painter’s tape. I used a scraper from the Simon Hurley Paste Tool Set to spread the Glitter Kiss over the stencil. I removed the stencil and cleaned it immediately with soap and water so the product wouldn’t harden on it. I set the mandala aside for a couple days while I worked on another project.

(I’ve found that spritzing the Glitter Kisses (and Cosmic Shimmer Metallic Gilding Polishes, too) with water keeps them moist and pliable. I use a Ranger Mister and spritz the product in their containers a couple times when I’ve finished using them.)

There were several parts of the baptism dress design that could have been used. I decided to cut out the back piece twice (with my Cameo 4) to make the front and back of the dress. I hand cut the mandala out and positioned it on the dress to get an idea of where I wanted to place it, then turned it over to put Scor-Tape on the back. I attached it to the dress and cut off the excess.  

I put two pieces of Scor-Tape, one on each side, at the top of the dress to adhere the front to the back. I threaded some ribbon through the two small holes, that the cameo had cut, and tied a bow. An additional piece of ribbon was added to make an empire waist and to add more detail to the dress.

To finish the card, I used my laptop to type Tillie’s full name, the date she was born, and the date she was baptized; then printed it off and included it on the inside of the card.

Materials Used:

  • Bazzill Cardstock, Coconut Swirl (Dress)
  • Multifarious Card, Lavinia Stamps (Mandala)
  • Baptism Dress Box, Design #300433-Silhouette Design Store
  • Altenew Intricate Mandala Stencil
  • Cosmic Shimmer Glitter Kiss-Lavender
  • Cosmic Shimmer Glitter Kiss-Silver Chrome
  • Simon Hurley Paste Tool Set
  • Tim Holtz Glass Media Mat
  • Scor-Tape: 1/4”, 3/8”
  • Ribbon

Machine:

Silhouette Cameo 4, with Silhouette Cameo Cutting Mat

Stay safe and warm!!!

Diane

Flying Home for the Holidays

I created this card using Lavinia Stamps and stencil, TH Distress Spray Stains, Metallic Gilding Polish, and Fairy-tales.

Winter has definitely arrived in Minnesota in the form of a blizzard!

While clearing the snow, I glanced up and noticed these lovely fairies and their dragons flying overhead. I waved and they stopped to introduce themselves. “I’m Nia and this is Everlee. Ollar and Vorloc are giving us a ride back home to the Enchanted Forest for the holidays.”

The fairies had a long ways to go, and the dragons were shivering, so I gave them a hug and gave the dragons a treat-fire crackers. They sprinkled me with fairy dust and climbed up onto their dragons. I heard Nia exclaim “Any place has to be warmer than here!” (My thoughts exactly.) As they flew out of sight, I thought ‘Those were fire dragons…come back and melt my snow!’

Materials Used:

  • Strathmore Watercolor Paper, Cold Press, 140 lb.
  • Black Cardstock Base
  • Lavinia Stamps: Nia, Everlee, Ollar, Vorloc; Stencil: Replenish (Tracey Lavinia Dutton is the artist of the Lavinia stamps and stencil.)
  • Ranger Tim Holtz Distress Spray Stain: Wilted Violet and Salvaged Patina
  • Cosmic Shimmer Metallic Gilding Polish, Purple Paradise
  • Lavinia Stamps Eco Glitter StarBrights, Fairy-tales (I sprinkled this over the Metallic Gilding Polish right after it was applied to the cardstock.)
  • Tim Holtz Stamp Platform
  • Ranger Mister
  • Sakura Gelly Roll Pen, Clear
  • VersaFine Clair Ink: Nocturne
  • Anita’s All Purpose Permanent Acrylic Paint, White (to create the snow)
  • Paintbrush
  • Tim Holtz Splat Box
  • Baby Wipes/Paper Towels
  • Scor-Tape, 3/8”

Have a Magical day!!!

Diane

Feels Like Home

I created this card using stamps by Lavinia Stamps and Tim Holtz Distress Spray Stains.

It seems like I blinked and summer was over. Fall is here…in Minnesota, there’re so many beautiful colors of leaves-reds, oranges, and yellows, mixed in with greens and browns. It’s breathtaking! There’s beauty in a fall day, but my favorite season is still summer because of all the abundant sunlight and warmth.

I just love the wisps on the fairy’s skirt and how it flows! When I saw this stamp, I whispered to myself ‘Oh, wow!’

To begin the card, I placed a piece of watercolor paper in a Tim Holtz Splat Box and sprayed Wilted Violet and Salvaged Patina Distress Spray Stains on the paper. I misted it with water, blotted off the excess with a paper towel, and let it dry.

I stamped the images using Nocturne VersaFine Clair ink. I didn’t get a solid stamped image of the fairy, so I used a small paintbrush with ink from the Nocturne ink pad and filled in the lighter areas. You can’t really tell from the pic, but a clear Gelly Roll pen added sparkle to the areas that I wanted to highlight.

To ground the fairy, trees, and sign, I used a metallic purple Gelly Roll pen to draw a ground line. I wanted to be more adventurous, but I was so close to completing the card. I didn’t want to chance it.

To finish, I attached the watercolor paper to a black cardstock base with Scor-Tape.

Materials Used:

  • Strathmore Watercolor Paper, Cold Press, 140 lb.
  • Core’dinations Cardstock Base, Jet Black
  • Lavinia Stamps: Olivia Large, Secret Garden Sign, Tree Den, Tree Stem, Flora Set, Bell Flower Vine, Forest Creeper, Wild Flower (Tracey Lavinia Dutton is the artist of the Lavinia stamps.)
  • Ranger Tim Holtz Distress Spray Stains: Wilted Violet, Salvaged Patina
  • Tim Holtz Stamp Platform
  • TH Glass Media Mat
  • TH Splat Box
  • VersaFine Clair Ink, Nocturne
  • Ranger Mister
  • Sakura Gelly Roll Pen, Clear
  • Sakura Gelly Roll Pen, Purple Metallic, #524
  • Paintbrush
  • Baby Wipes/Paper Towels
  • Scor-Tape, 3/8”

Thanks for stopping by! Have a Magical day!!!

Diane

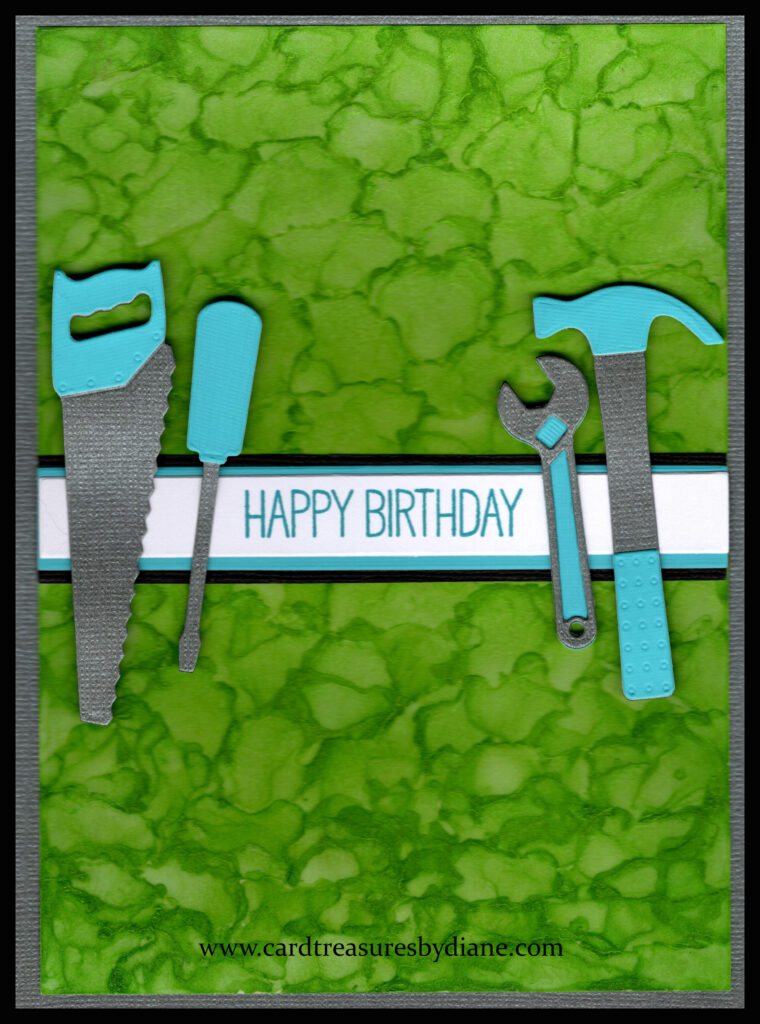
Alcohol Ink with Tools

I created this card using Alcohol Ink Pearls. a die and sentiment stamp from My Favorite Things Stamps, and Sentiment Labels dies from Simon Says Stamp.

I love the look of Pearls-so much sparkle and shimmer!!!

To begin the card, I put drops of Sublime Alcohol Ink Pearl onto a piece of Yupo paper and used a Giottos air blaster to control the spread of the ink. After it dried, I sprayed two coats of Krylon Matte Finish to seal the ink, waiting about 20 minutes between each coat.

I die cut the tools and used Multi Medium Matte to adhere the pieces of the tools together. Next, I die cut three different sizes of sentiment labels; stamped the sentiment; used Scor-Tape to adhere them together, and then to the inked Yupo paper.

I turned the tools over and put Scor-Tape on the sections that would be adhered to the sentiment label, with the exception of the screwdriver-I used Multi Medium Matte for that. I placed 3-D Foam on the sections of the tools that would be adhered to the Yupo paper.

To finish the card, I attached the Yupo paper to grey cardstock, followed by a black cardstock base.

I created this card for my youngest son’s birthday. He, and his wife, have done beautiful home improvement projects. For this card, I used the colors (as close as I could come to their paint colors) they had used for three of their projects. Incorporating the tool theme seemed like a good fit also, and he said he liked the card.

Materials Used:

  • Tim Holtz Alcohol Ink Yupo Paper, Translucent
  • Bazzill Cardstock, Tungsten
  • Darice Cardstock, Abracadabra
  • Scrap piece of aqua and white cardstock
  • My Favorite Things Die-namics, Tool Time, MFT-1754
  • MFT Stamps, Adorable Elephants Stamp Set, BB28: For the Sentiment
  • Simon Says Stamp Sentiment Labels Wafer Dies, SSSD-111836
  • Ranger TH Alcohol Pearl, Sublime
  • VersaFine Clair Ink, Warm Breeze
  • Giottos AA1900 Rocket Air Blaster, LARGE
  • Tim Holtz Stamp Platform
  • Ranger Multi Medium Matte
  • Tombow 3D Foam Tabs, Assorted Pack
  • Therm-o-web 3D Foam Squares, Pack: 1/4″ and 1/2″
  • Krylon Matte Finish
  • Scor-Tape: 1/8”, 1/4″, and 3/8”
  • Sheet of aluminum foil (to protect my table surface from the alcohol ink)
  • Rubber Gloves, Baby Wipes, and Paper Towels

Machine:

  • Sizzix Big Shot, with two cutting pads, and the magnetic platform.

Thanks for stopping by my website! Have a Blessed Day!!!

Diane

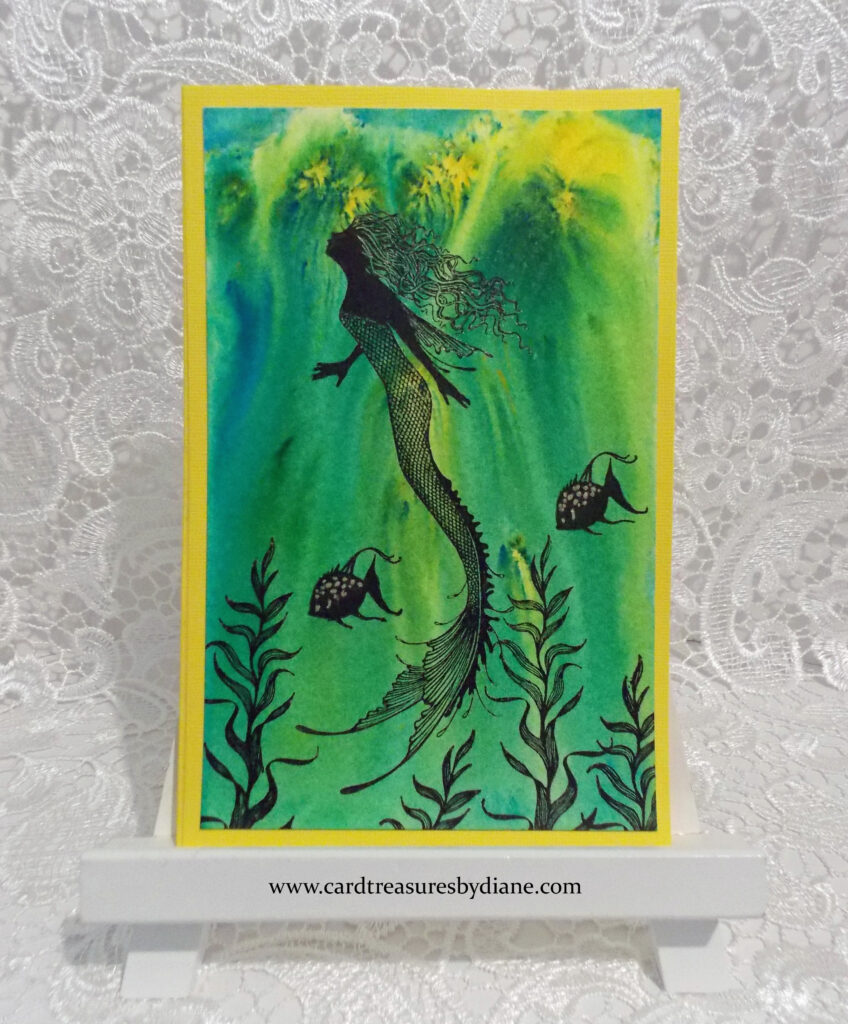
A Sun-kissed Day

I created this card with love using Brushos and Lavinia stamps.

My oldest Granddaughter has always loved dragons and mermaids so I made this for her 16th birthday.

To begin the background, I sprinkled Yellow and Turquoise brushos over the surface of the watercolor paper. I spritzed water upwards to create the waves, then lifted and tilted the paper so that the brushos and water ran towards the bottom of the paper. After the paper had dried, I stamped the images with VersaFine Clair Nocturne ink.

I put a strip of Salty Ocean Distress Ink on a glass mat; spritzed it with water; and painted the area above the waves that was white to create the sky. I used a Clear Gelly Roll pen to add sparkle to the inked images. To preserve the card, I applied Distress Micro Glaze, with a mini-ink blending tool, and buffed it with a cloth.

To finish the card, I attached the watercolor paper to a yellow cardstock base.

Materials Used:

  • Strathmore Watercolor Paper, Cold Press, 140 lb.
  • Bazzill Cardstock, Bazzill Yellow
  • Lavinia Stamps: Zelith, Marine Kelp, Sea Creatures (Tracey Lavinia Dutton is the artist of the Lavinia stamps.)
  • Colourcraft Brusho Crystal Colours: Yellow, Turquoise
  • Ranger TH Distress Ink: Salty Ocean
  • Ranger Mister
  • Sakura Gelly Roll Pen, Clear
  • VersaFine Clair Ink: Nocturne
  • Tim Holtz Stamp Platform
  • Tim Holtz Glass Media Mat
  • Ranger TH Distress Micro Glaze
  • Ranger TH Mini Ink Blending Tool/Foam
  • Lint Free Cloth
  • Paintbrush
  • Baby Wipes/Paper Towels
  • Scor-Tape: 3/8”

I hope you have a Sun-kissed day!!!

Diane

A Purrfect Heart

I created this card using Tim Holtz Distress Inks, the Lavinia Stamps Pods stencil and Noof stamp, and Distress Glitter-clear rock candy.

To begin the card, I used Nocturne VersaFine Clair ink to stamp Noof on multifarious cardstock. I created a mask by stamping the image again on a separate sheet of paper and doing a rough cut around him with a scissor (focusing mainly on his body and not the fur). I placed the mask over the original stamped image; then, using Picket Fence Studios brushes, sponged Wilted Violet, Salty Ocean, and Villainous Potion Distress Inks around him. Success! I was trying to create an aura.

I removed the mask and sponged Wilted Violet, Salty Ocean, Villainous Potion, and Squeezed Lemonade  Distress Inks over Noof, with the exception of the area of fur that I wanted to remain white.

I sponged Villainous Potion Distress Ink to the edge of the cardstock; then placed the Pods stencil on top. Using a Lavinia Stamps stencil brush, I applied Squeezed Lemonade over a part of the stencil and then blended those areas.

I applied IndigoBlu FlitterGlu, with a paintbrush, to create his white fur and the snow on the ground; then sprinkled Distress Glitter-clear rock candy over those areas. What I like about the Rock Candy is I can see through it to the layer beneath it, and it gives you so much sparkle-when I’m going for the see-through look.

I used a Black Copic Multi Liner to touch up Noof’s fur. To brighten the whites in his eyes (because some distress ink had gotten on them) I carefully used a white Posca pen, then added a touch of distress inks to the irises. To add more sparkle, I highlighted some lines on Noof with a Clear Gelly Roll pen.

I wanted to try something different, so I put a sheet of alcohol ink black cardstock in a salad spinner. I put a few drops of Villainous Alcohol Pearl on top and gave the salad spinner a few turns. (I bought it specifically for this purpose, as once you use it for alcohol inks, it can’t be used for food.) I wish you could see the result-random purple lines with lots of sparkle.

I attached the multifarious card to the purple cardstock, followed by the alcohol ink black cardstock, finishing with a black cardstock base.

Materials Used:

  • Multifarious Card, 20xA5, Lavinia Stamps
  • Purple Cardstock
  • Tim Holtz Alcohol Ink Cardstock, Matte Black
  • Black Cardstock Base
  • Lavinia Stamps Stencil: Pods; Stamp: Noof (Tracey Lavinia Dutton is the artist of the Lavinia Stamps stencil and stamp.)
  • Ranger Tim Holtz Distress Inks: Wilted Violet, Salty Ocean, Villainous Potion, and Squeezed Lemonade
  • VersaFine Clair Ink: Nocturne
  • Ranger Alcohol Pearl, Villainous
  • Salad Spinner
  • Lavinia Stamps Stencil Brush
  • Tim Holtz Stamp Platform
  • Tim Holtz Glass Media Mat
  • Ranger TH Distress Glitter-clear rock candy
  • Picket Fence Studios Life Changing Blender Brushes
  • Uni Posca Marker Pen, Extra Fine, 0.7mm
  • IndigoBlu FlitterGlu
  • Copic Multi Liner, Black, 0.3
  • Stardust Gelly Roll Pen, Sakura, Clear
  • Scor-Tape: 3/8”
  • Baby Wipes/Paper Towels

Thanks for stopping by my website. Have a Beautiful day!!!

Diane

A Beautiful New Chapter Begins

I created this card using Lavinia Stamps, Brushos, Copics, and a sprinkling of moon dust.

HAPPY SPRING!!!

Here, in Minnesota, we can go through four seasons in a single day…especially in the spring. There’s snow in the forecast for next week, as well as temps in the 50’s. So, I was overjoyed when Lily Moonsparkle, the fairy in charge of spring this year, stopped by to give me an update. She said she’s been negotiating with Mother Nature, who is requesting better working conditions due to climate change. When negotiations are going good-sunshine and warmth; not so good, snow. But, Lily is confident they will reach an agreement soon and a beautiful spring will follow!

To begin the background, I sprinkled Yellow and Turquoise brushos over the surface of the watercolor paper. I spritzed the brushos with water and lifted and tilted the paper so that the brushos and water ran towards the bottom of the paper; then let the paper dry for a bit.

I stamped the images with VersaFine Clair Nocturne ink, with the exception of the tree leaves. Next, I colored the trees with Copics. To stamp the leaves, I put VersaFine Clair Acorn ink on half of the Twisted Vine stamp and VersaFine Clair Verdant on the other half; inking again each time I used the stamp.

To create the ground, I applied IndigoBlu FlitterGlu using a paintbrush and sprinkled Rose Copper Moon Dust over it. You can’t really tell from the pic, but the ground really glitters.

Now comes the really fun part…adding A LOT of fairy sparkle. Using a clear Gelly Roll pen, I highlighted Freya’s wings, the trees, flowers, grass, and the miniature stars. I also used a Black Copic MultiLiner to add definition to the miniature stars. At this point, I think the Sparkle Fairy stopped by and whispered “Not enough.” So, I used a Quickie Glue pen to highlight even more areas and sprinkled some Holographic Embossing Powder over that, then tapped off the excess. Can you have too much glitter? Not according to the Sparkle Fairy.

To finish the card, I attached the cardstock to a black cardstock base.

Materials Used:

  • Strathmore Watercolor Paper, Cold Press, 140 lb.
  • Core’dinations Cardstock Base, Jet Black
  • Lavinia Stamps: Freya, Tree Den, Tree Stem, Twisted Vine Set, Silhouette Foliage Set, Silhouette Grass, Stars Miniature (Tracey Lavinia Dutton is the artist of the Lavinia stamps.)
  • Colourcraft Brusho Crystal Colours: Yellow, Turquoise
  • Copics: Tree-E25, E57, E59, E99; Moss on Tree-YG23, YG67; Highlights on Moss-Y04, FY1; 0 Colorless Blender
  • Rose Copper Moon Dust (Lavinia Stamps)
  • Ranger Mister
  • Copic MultiLiner, Black, 0.3
  • Sakura Gelly Roll Pen, Clear
  • VersaFine Clair Ink: Nocturne, Acorn, Verdant
  • Sakura Quickie Glue Pen
  • IndigoBlu FlitterGlu
  • Ranger Holographic Embossing Powder
  • Tim Holtz Stamp Platform
  • Tim Holtz Glass Media Mat
  • Paintbrush
  • Baby Wipes/Paper Towels
  • Scor-Tape: 3/8”

Have a Magical Day filled with Wonder!!!

Diane

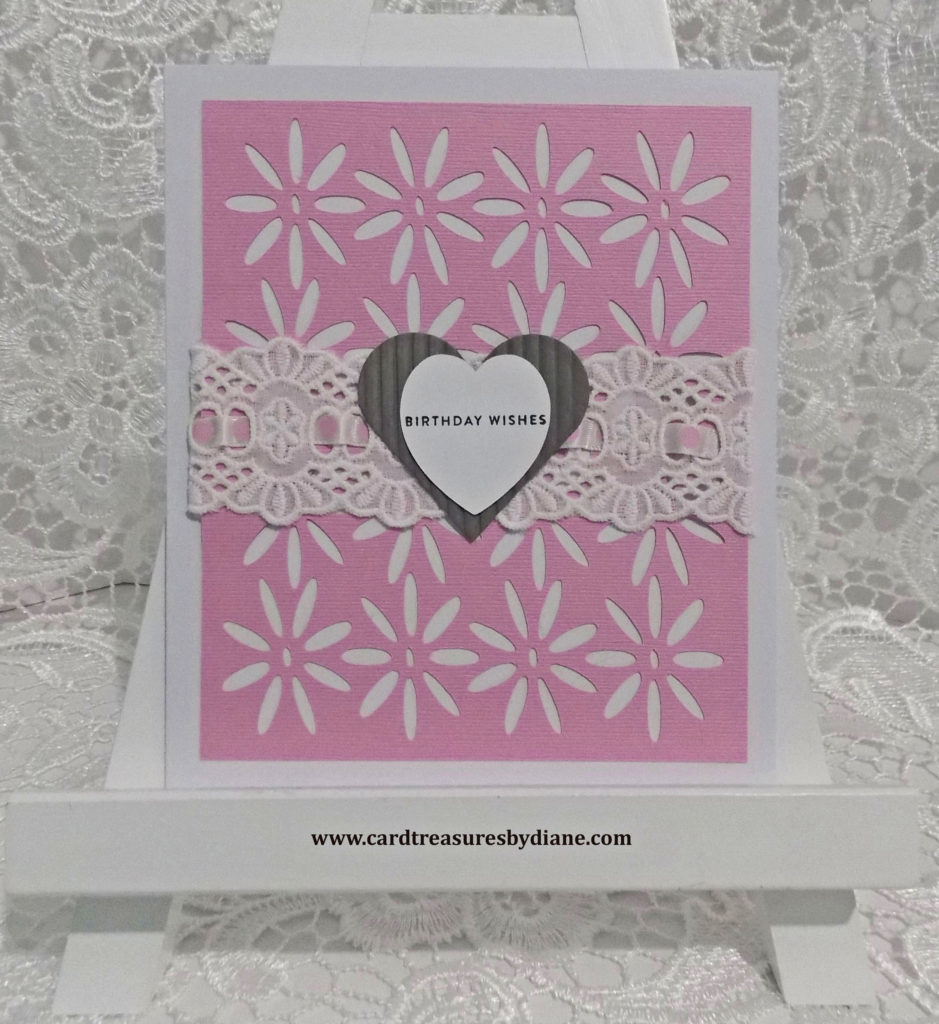
Daisy Love

I created this card using a design from the Silhouette Design Store, a sentiment stamp from Simon Says Stamp, a Spellbinders die, and lace.

My amazing daughter loves daisies, so I designed this card for her birthday. I’ve always considered myself so lucky to have her as a daughter, as well as my friend.

Materials Used:

  • Bazzill Cardstock, Fussy
  • Park Lane Paper, White Core, Smooth, 110 lb.
  • Daisy Card-Design ID 191185, Artist: Sweet Afton-Silhouette Design Store
  • Spellbinders Nestabilities, Classic Heart, S4-136
  • Simon Says Stamp, Tiny Words Set, SSS101883
  • Tim Holtz Stamp Platform
  • Dark Grey Corrugated Cardstock
  • White Heart from a previous Silhouette design
  • Lace
  • Polka Dot Ribbon
  • Aleene’s Original Tacky Glue (to attach the lace and grey heart)
  • Scor-Tape: 1/4”, 1/8”

Have a Beautiful day!!!

Diane

Happy Valentine’s Day

I created this card using Lavinia Stamps, Tim Holtz Distress Ink, Brushos, a Sizzix die, and a Posca Pen.

Happy Valentine’s Day to you and yours!!!

It’s official: There’s only six more weeks of winter because I just saw a fairy! I know what you’re thinking…what’s a fairy doing in Minnesota in WINTER, when wind chill temperatures can reach 50 below? I only got a quick glance of her, as she peeked out from behind the fairy door, but I think I saw a fishing rod in one of her hands. That could mean only one thing…ice fishing!

I sprinkled Cobalt Blue, Violet, and Turquoise brushos over the surface of the watercolor paper to create the blue part of the galaxy. I spritzed the brushos with water and lifted and tilted the paper so that the brushos and water ran towards the bottom of the paper; then let the paper dry for a bit.

Next, I die cut a circle in the middle of the paper using a Sizzix die. To preserve the brushos, I applied Tim Holtz Distress Micro Glaze (with a blending tool) over the paper, then wiped off the excess. To create the stars, I tapped a large stencil brush against a white Posca Marker Pen several times.

I used the smooshing technique to create the pink watercolor paper behind the brusho galaxy. I put distress ink on a glass media mat; spritzed it with water until the water beaded; and pressed the paper into the distress ink. I repeated this process a few times until I achieved the look I wanted.

To determine where to stamp the images, I placed the brusho watercolor paper on top of the pink distress inked paper and traced around the die cut circle.  A clear Gelly Roll pen worked really well for this purpose. (I usually outline the moon on a card with this pen anyway to highlight it.)

After I stamped the images, I noticed that some areas on the fairy weren’t inked completely because of the background. To remedy this, I dabbed a small paintbrush on the Nocturne VersaFine ink pad and used the paintbrush to fill in the missing ink.

To add sparkle, I highlighted the hearts and some other areas with the clear Gelly Roll pen.

To finish the card, I attached the two layers using Scor-Tape, followed by a white cardstock base.

Materials Used:

  • Strathmore Watercolor Paper, Cold Press, 140 lb.
  • Park Lane White Paperie, White Core, Smooth, 110 lb.-Cardstock Base
  • Lavinia Stamps: Tia, Fairy Charms, and Woodland Sprite-the leaf and flowers part of the stamp (Tracey Lavinia Dutton is the artist of the Lavinia stamps.)
  • Sizzix Framelits-Circles, 657551
  • Colourcraft Brusho Crystal Colour: Cobalt Blue, Violet, and Turquoise
  • Ranger TH Distress Ink, Picked Raspberry
  • Uni Posca Marker Pen, Extra Fine Point: White
  • Large Stencil Brush
  • Sakura Gelly Roll Pen, Clear
  • Tim Holtz Stamp Platform
  • Tim Holtz Glass Media Mat
  • VersaFine Clair Ink: Nocturne
  • Ranger Mister
  • Ranger Tim Holtz Distress Micro Glaze
  • Ranger TH Mini Ink Blending Tool/Foam
  • Scor-Tape: 3/8”
  • Baby Wipes/Paper Towels

Machine:

  • Sizzix Big Shot, with two cutting pads, and the magnetic platform.

Have a Magical day!!!

Diane